I moved to a new URL! Check it out!

posts tagged with: programming

Quick Explosion Stuff

Quick Explosion Stuff
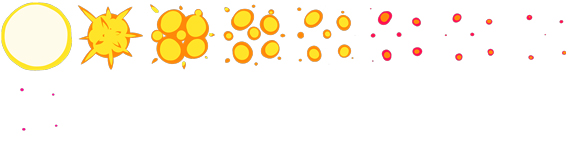
Last night I had the opportunity to talk about explosions in front of a group of game developers. I ended up doing a live demo of making an explosion effect from scratch. Here's what I ended up with after about 45 minutes:

Image


Not my best work but not bad for having to come up with something on the fly in front of a bunch of people. I ended up using Photoshop for animations, ShoeBox to spit out sprite sheets, and Otter to implement the effects.

Image


One of the fun things of the presentation was adding suggestions from the audience which included spawning more explosions from the first explosion. This is why the whole screen briefly fills up with explosions and then calms down again. It uses a quick recursion to make the explosions chill out after a couple of booms.

Image


I had a lot of fun doing this and I want to turn it into some kind of screen cast or stream. I didn't end up recording it since I didn't want to really complicate the set up at the last minute. Running a live demo is already scary enough.

The full source code is available here. The assets needed are uploaded here. If I do a more full version of this talk I'll be sure to post it here!

Otter Surface Example

Otter Surface Example
Just a quick post going over how I usually use Surfaces in Otter. A surface is basically a render texture, or render target. The idea of calling it a surface mostly comes from Game Maker.

By default Otter will render all of the graphics to the main surface. However you can make your own surfaces and use them in various ways. The main point of this quick example is to show how to separate HUD elements and gameplay onto different surfaces. The big advantage of doing this is you can now freely rotate and zoom the camera and the HUD will be unaffected.

Alright let's check out the codes!
class Program {
static void Main(string[] args) {
// Create a new game to play.
var game = new Game();

// Set the scroll of the surfaces to 0 so they never scroll on the camera.
Global.SurfaceGameplay.Scroll = 0;
Global.SurfaceHud.Scroll = 0;

// Start the game with a new GameScene.
game.Start(new GameScene(1000, 1000));

}
}

class GridBackground : Entity {
public GridBackground() : base() {
Layer = 10;
Surface = Global.SurfaceGameplay;
}

public override void Added() {
base.Added();

// Just render a simple grid background so when the camera scrolls we can see it.
AddGraphic(new Grid(Scene.Width, Scene.Height, 40, 40, Color.Cyan));
Graphic.Alpha = 0.4f;
}
}

class Player : Entity {
public Player(float x, float y) : base(x, y) {
// Add a basic red box for the graphic.
AddGraphic(Image.CreateRectangle(20, 20, Color.Red));
Graphic.CenterOrigin();

// Assign this entity to render to Global.SurfaceGameplay instead of the default game surface.
Surface = Global.SurfaceGameplay;

// Set up a collider for movement.
var collider = AddCollider(new BoxCollider(20, 20));

// Set up the rest of the movement stuff.
var axis = AddComponent(Axis.CreateWASD());
var movement = AddComponent(new BasicMovement(400, 400, 30));
movement.Axis = axis;
movement.Collider = collider;
}
}

class PlayerHud : Entity {
public PlayerHud() : base() {
// Basic hud test with just some text.
AddGraphic(new Text("This is the HUD!", 20));

Surface = Global.SurfaceHud;
}
}

class GameScene : Scene {
public GameScene(int width, int height) : base(width, height) {
// Add the entities to the scene when the scene is created.
Add(new Player(HalfWidth, HalfHeight));
Add(new GridBackground());
Add(new PlayerHud());
}

public override void UpdateLast() {
base.UpdateLast();

// Set the scene's camera to follow the player.
var player = GetEntity<Player>();
CenterCamera(player.X, player.Y);

// Set the surface's camera to follow the scene's camera.
Global.SurfaceGameplay.CameraX = CameraX;
Global.SurfaceGameplay.CameraY = CameraY;

// Zoom the surface up and down with the arrow keys.
if (Input.KeyDown(Key.Down)) {
Global.SurfaceGameplay.CameraZoom -= 0.005f;
}
if (Input.KeyDown(Key.Up)) {
Global.SurfaceGameplay.CameraZoom += 0.005f;
}
}

public override void Render() {
base.Render();

// Render the surfaces.
Draw.Graphic(Global.SurfaceGameplay);
Draw.Graphic(Global.SurfaceHud);
}
}

class Global {
// Keep global references to the surfaces used for rendering the game.
public static Surface SurfaceHud = new Surface(640, 480);
public static Surface SurfaceGameplay = new Surface(640, 480, Color.Gray);
}
The full version is available on pastie.

I have a simple player class, and background class which both render to the surface designated for gameplay. Then the player HUD class is assigned to render to the hud surface. The scene will then take care of rendering both of those surfaces to the game's main surface. I render in the scene's Render method because that will be the very last thing that renders in the frame.

I know some people have been having trouble understanding surfaces fully and how to use them so I hope this example helps. Surfaces can be really powerful especially when you start getting into shaders and one of my main goals for Otter was to make using surfaces as painless as possible.

Dev Log: Graphs

Dev Log: Graphs
Almost done with this game now except for a bunch of polish work that I made for myself. One of the things I'm doing for the results screen is a cool graph for various things in the game.

I started out with just graphing the score and the orb's health:

Image


Then I added the player's health as well:

Image


And now the final version has those plus markers for when events started:

Image


You can even zoom in and scroll around the graph to see the more interesting points as you walk down memory lane remembering the times where you got ambushed by a bunch of eyeballs shooting purple lasers at you.

Getting closer to done! But... I still need to put audio in the game at some point.

Otter Updates

Otter Updates
I finally merged in all of my pending changes into the main branch of Otter! If you've been using the dev branch for the past few months not much has changed, but things finally stabilized enough to the point where I felt comfortable updating the main branch.

Afterwards I've done some minor adjustments and fixes:

* Using Game.EnableAltF4 now checks for either Alt key on the keyboard.

* The RandomElement() function in NaturalLanguage now uses Otter's Rand class to ensure consistency if you're using a preset random seed.

* Added Snake.AddAllVertebraeToScene()

* Axis and Button keys, joysticks, mousebuttons, etc, are now public accessible.

* Renamed Button.AddButton to AddJoyButton.

* Axis and Buttons can now add keys, buttons, etc, from other Axes and Buttons. Useful if you want to copy a button or axis.

* GridCounter now has MoveUp(), MoveDown(), MoveLeft(), and MoveRight()

Slowly and surely moving towards a 1.0 version!

Pretty Skies through Shaders

Pretty Skies through Shaders
For the full version of Super Sky Sisters I wanted to spend some time making a really cool looking sky backdrop for the action to take place on. The original prototype has a decent looking sky, but I think I whipped it up in under an hour and looking back at it now it looks like crap.

Image


So I turned to my old friend Photoshop for some advice. I played around with various ways of making a cool looking sky, and I eventually I came back around to using a Gradient Map to manage the colors of a black and white image. If you didn't know, I'm a huge fan of using gradient maps. When it comes to high resolution art I tend to have a lot of trouble with choosing palettes and maintaining that palette through the painting. It's really easy to muddy up the colors if I start eye dropping the wrong parts of the image, and working in high res really makes me miss the amount of control I have over my palette when working with pixel art... but gradient maps are a good band aid for this!

I feel like a broken record with gradient maps so I won't go into too much detail for this post on what they are. To put it simply an image's colors can be remapped to a new set of colors based on lightness. Here's a quick example of what that means.

Image


So how can I use this for painting skies? By using a gradient map to take care of all the colors all I have to do is paint up something in grayscale first...

Image


And then I can spend a little time making a nice sky colored gradient...

Image


Then I can apply that to the image as a gradient map and like some kind of magic my image has awesome colors!

Image


My idea for the sky at this point was to have one static sky image, and then decorate it with a bunch of varied cloud sprites. The total amount of assets I use for rendering the sky are as follows:

Image


Image


Image


My first thought at this point was to just apply the gradient map to the asset directly and export it with the blue colors baked in. If I did it that way then I wouldn't need to worry about using any shaders in the game, and I thought that would be the best bet, but I quickly ran into an issue with the color.

It turns out baking a gradient map into an image with alpha has pretty undesirable results. Check out how one of the clouds look when the gradient map is baked in.

Image


When using these sprites on top of an already baked in sky background I end up getting some colors that are less than ideal. Some parts come out grey and white and black which can look pretty ugly. So I ended up scrapping the whole baked in gradient map idea.

Instead I just exported all of my assets in grayscale and also exported the gradient. I then applied a relatively simple shader just to apply that gradient map to the image. In Otter I'm using a Surface to render the entire sky to. That surface then has the shader along with the gradient texture. The result looks like this:

Image


It looks incredibly cool in motion, but unfortunately it's tough to show it without a full video recording. There's too many colors going on for a gif to really show how cool it looks.

A cool side effect of using a shader with a real time gradient map application is that I can switch to a different gradient and the sky can be totally different. For example I can take a gradient that looks like this:

Image


And the sky then looks like this:

Image

Dev Log: Otter Updates!

Dev Log: Otter Updates!
In case you didn't know I have a free to use open source 2d game making framework named Otter. It's built on top of SFML.NET and uses C#. Here are some recent changes available in the dev branch!

* Color.AddCustom() and Color.Custom() added. This is a handy way to define custom colors by Enum and later retrieve them. I didn't like making my own static colors class for each project to keep track of my custom colors, so I added some functionality to the Color class.

* BitmapFonts have been almost finalized. They should be usable now for the most part and you should be able to import fonts from a handful of different editors. You can check out what editors are supported in the class itself with the Enum BitmapDataType.

* RichText has been updated and fixed once again. I guess I've been doing kerning wrong all this time and I think I finally have it corrected. RichTextCharacters also have some new values to play with like their X and Y offset positions, scale and rotation and more.

* Added Enum.HasFlag() as an extension method. This is a handy way to check if an Enum with a [Flags] attribute contains a specific flag. I guess you can use this if you're not comfortable looking at the bitwise operators or whatever they're called (I sure am not!)

* Shader.AddParameter() is now available to register your shader parameters as an Enum. Now you can just define it once and use the Enum everywhere which should reduce pesky typos when working with shaders.

* StateMachine has been scrapped and StateMachine<> has been upgraded a little bit. It's now possible to use a stack of States in a StateMachine<> and it will run the top most state. Also now if you call ChangeState (or if you push and/or pop states) during a StateMachine's update function the StateMachine will wait until the update has finished before applying the state change!

* Fixed a typo in the Shader class whoops (SetParamter?)

* Surfaces now have their Display() function exposed. This is crucial in using a Surface that doesn't render at all, like if you're using a Surface as input to a Shader. Without calling Display() the texture will be upside down.

* Updated Collider and Entity and Graphics with more stuff like SetPosition(), SetOrigin(), and other handy stuff.

* Surface.SaveToFile() will now automatically save with a timestamp file name as a png if you don't specify an output file path. Handy for taking a bunch of screenshots during a session.

* NineSlice has some new utility functions like SetBorderPadding. I found it easier to define the areas of a NineSlice object in this way instead of trying to figure out what the bounds of the rectangle inside the texture was.

* RichText now will always round its origin since setting the origin to a 0.5f value results in blurry text!

* Fixed a bad bug in the PolygonCollider which resulted in the collider not using the transformed polygon for collision checks.

* Added 3D Audio support thanks to Fruckert.

* Lots of little bug fixes and tuning changes here and there.

Once again this is all available on the dev branch. I'll be pushing a whole bunch of changes to main branch as soon as I can sit down and write some documentation up for the new and changed stuff.