Web Work Flow
My web work flow is constantly changing as the crazy world of web design is always on the move. Everything changes every day and what a website needs to do and look like is always moving with the technology that lets people view websites.
For writing actual web code stuff (javascript, html, css, php, etc) I've switched to Atom Editor. I have a bunch of packages that help smooth things out:
Atom Beautify
File Icons
Minimap
Project Manager
I was on a big Sublime Text kick but for some reason Atom Editor just works a little bit better for me. I was able to figure out project views in Atom Editor, and the Project List plugin lets me easily save projects and go back to them later. Atom Editor seems to have slightly worse performance than Sublime though, but that probably has a lot to do with installing way too many plugins.
By far the easiest way to get something up and running quickly is running a local web server. I develop on Windows so I find a lot of success with Wamp. Wamp runs an apache web server locally so everything like php and mysql is running right from the start. I can screw around as much as I want locally before worrying about uploading it to any web server.
One thing to keep in mind though is that often my remote server is going to differ from my local server. My username and passwords might be different on my remote server than on my local server where I usually just use root for everything. To get around this easily I do a quick check of the server's IP address when running certain chunks of php code. Basically if my php method that checks the server IP address comes back with "127.0.0.1" which is localhost then I can run some things a little differently. Change usernames and passwords, and other stuff like change error reporting levels and whatever else is useful. This is a handy thing to know if you're developing locally and then moving to remote!
I still stick with the tried and true combo of php and mysql. Some things have changed over the years with updated versions of php. Some of the mysql syntax has changed into this "mysqli" business that is supposed to be more secure, but basically I am still running on the same blog platform I wrote about 7 years ago now. It is a totally custom made set up that isn't too complicated, but making it completely custom and closed source means I'm not subject to mass vulnerabilities from stuff like WordPress.
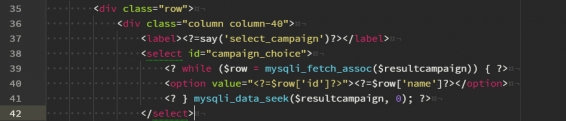
Using Smarty for my template system has paid off in a huge way with this redesign. A long, long time ago I used to just mash all of my html and php together into a horrible Frankenstein's monster mess of a website, but I was turned onto Smarty a while back and I've never looked back since.
If you're using php using a template system like Smarty is an absolute must in my opinion. Basically you can tuck all of your php away into some core php files, and then have your website use smarty template files that can easily insert data from your php sources. Basically the php's job at that point is to create Smarty template objects and then feed those objects the data they need. Smarty is not really mean to be a logic or programming type solution, but it does have some basic things that are more than enough to get by.
Essentially this made it so for this redesign I didn't have to touch any of my php. I did have to adjust a few lines in my php code because of how the layout changed. For example in my php core codebase I get all of the data from my Twitter feed. Originally my twitter feed was in my header template that appeared on all of my pages, but now it only appears on the sidebar of my blog. All this meant was that I had to feed the twitter data to my blog template instead of the header template. Beyond that all the changes were just done on my Smarty template.
Smarty creates a safe layer that I can screw around on knowing that I'm not going to destroy anything on the php side accidentally. When I finished the mock up of this redesign all I had to do was reference my old design to see what smarty tags I had to include for things like the sidebar entries, blog posts, and the data for the stuff on the games, draws, webs, and miscs pages. So with the same underbelly I have a completely new looking website. Neat!
For the front end side I made use of a lot of handy things from the web. jQuery for some fancy animation and ajax stuff. Lity for light boxing images. Google Fonts for the handwritten looking fonts, and animate.css for reference on creating the animations for hovering over certain things.
One of the things I love about web development is how open the entire world of it is. There are so many solutions for common problems that thousands or maybe millions of developers have hit, so it never feels like I'm working alone. The game dev scene has been approaching that steadily, but there is a level of openness and togetherness that the web community has right now that seems totally unmatched.
Web dev is also a good break for my brain which can be utterly destroyed by the near infinite complexity of video game programming.
Coding
For writing actual web code stuff (javascript, html, css, php, etc) I've switched to Atom Editor. I have a bunch of packages that help smooth things out:
Atom Beautify
File Icons
Minimap
Project Manager
I was on a big Sublime Text kick but for some reason Atom Editor just works a little bit better for me. I was able to figure out project views in Atom Editor, and the Project List plugin lets me easily save projects and go back to them later. Atom Editor seems to have slightly worse performance than Sublime though, but that probably has a lot to do with installing way too many plugins.
Server
By far the easiest way to get something up and running quickly is running a local web server. I develop on Windows so I find a lot of success with Wamp. Wamp runs an apache web server locally so everything like php and mysql is running right from the start. I can screw around as much as I want locally before worrying about uploading it to any web server.
One thing to keep in mind though is that often my remote server is going to differ from my local server. My username and passwords might be different on my remote server than on my local server where I usually just use root for everything. To get around this easily I do a quick check of the server's IP address when running certain chunks of php code. Basically if my php method that checks the server IP address comes back with "127.0.0.1" which is localhost then I can run some things a little differently. Change usernames and passwords, and other stuff like change error reporting levels and whatever else is useful. This is a handy thing to know if you're developing locally and then moving to remote!
Php & mySql
I still stick with the tried and true combo of php and mysql. Some things have changed over the years with updated versions of php. Some of the mysql syntax has changed into this "mysqli" business that is supposed to be more secure, but basically I am still running on the same blog platform I wrote about 7 years ago now. It is a totally custom made set up that isn't too complicated, but making it completely custom and closed source means I'm not subject to mass vulnerabilities from stuff like WordPress.
Smarty
Using Smarty for my template system has paid off in a huge way with this redesign. A long, long time ago I used to just mash all of my html and php together into a horrible Frankenstein's monster mess of a website, but I was turned onto Smarty a while back and I've never looked back since.
If you're using php using a template system like Smarty is an absolute must in my opinion. Basically you can tuck all of your php away into some core php files, and then have your website use smarty template files that can easily insert data from your php sources. Basically the php's job at that point is to create Smarty template objects and then feed those objects the data they need. Smarty is not really mean to be a logic or programming type solution, but it does have some basic things that are more than enough to get by.
Essentially this made it so for this redesign I didn't have to touch any of my php. I did have to adjust a few lines in my php code because of how the layout changed. For example in my php core codebase I get all of the data from my Twitter feed. Originally my twitter feed was in my header template that appeared on all of my pages, but now it only appears on the sidebar of my blog. All this meant was that I had to feed the twitter data to my blog template instead of the header template. Beyond that all the changes were just done on my Smarty template.
Smarty creates a safe layer that I can screw around on knowing that I'm not going to destroy anything on the php side accidentally. When I finished the mock up of this redesign all I had to do was reference my old design to see what smarty tags I had to include for things like the sidebar entries, blog posts, and the data for the stuff on the games, draws, webs, and miscs pages. So with the same underbelly I have a completely new looking website. Neat!
Other Cool Stuff
For the front end side I made use of a lot of handy things from the web. jQuery for some fancy animation and ajax stuff. Lity for light boxing images. Google Fonts for the handwritten looking fonts, and animate.css for reference on creating the animations for hovering over certain things.
One of the things I love about web development is how open the entire world of it is. There are so many solutions for common problems that thousands or maybe millions of developers have hit, so it never feels like I'm working alone. The game dev scene has been approaching that steadily, but there is a level of openness and togetherness that the web community has right now that seems totally unmatched.
Web dev is also a good break for my brain which can be utterly destroyed by the near infinite complexity of video game programming.
No Comments