I moved to a new URL! Check it out!

posts dated from: march 2013

Adobe AIR Window Scaling

Adobe AIR Window Scaling
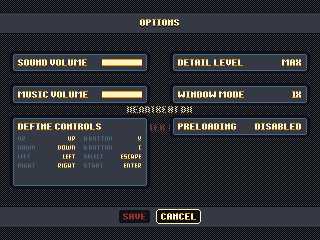
Over the past week I added some menus and options to my Global Game Jam game remake. I'm doing this super early on in the game's life because having some awesome polished menus makes it feel like a "real" game, which motivates me to work on it more. One of the first things I did for the game options was window scaling. The game natively runs at 320 x 240, so obviously players are going to want some various scaling options unless they really want to run it at 1x and barely see the game on their screens that are now probably 4000 pixels wide.

The awesome thing about working in AIR is that it will automagically resize the game's window to the size of the flash stage, so all I have to do is set the stage width and the stage height and the window will resize to match. However, there are some funky issues that can arise.

The flash stage has different scaling modes that you can use. There's EXACT_FIT, NO_BORDER, NO_SCALE, and SHOW_ALL. For the case of this game, I'm using EXACT_FIT after I resize the window. The reason for this is so that players with super huge monitor set ups can scale the window themselves.

This was actually a problem with Offspring Fling until the lastest update. I had a player that had a desktop width of over 4000 pixels because of their multimonitor set up. They couldn't play in fullscreen mode because it would scale across both monitors, and they couldn't play in windowed mode because it was too tiny. Changing the window mode to EXACT_FIT made it so anyone can scale the window to whatever size they want. I could've also used SHOW_ALL, which would maintain the game's aspect ratio as it scaled, but some users wanted to stretch the game to fill their entire monitor. (WHY?!)

Flashpunk NineSlice Class (Updated!)

Flashpunk NineSlice Class (Updated!)
Last week I posted a quick NineSlice class that I wrote to work in Flashpunk. It was a little clunky, so this past week I cleaned it up and integrated it with Flashpunk's graphic system. The new version now extends Image, so you get all the awesome Image effects like color tinting, rotation, scaling, and more. Check out the new version!

NineSlice.as

As a quick example, here's how I'm using it in my current project. Check out this screenshot of a menu:

Image

Thanks to the handy dandy nine slice object, most of this menu is just drawn with a couple of simple source images. I scaled them up 4x so you could see them a little better.

Image

Just using these images as sources means I don't have to make a new image every time I want to change the size of one of the widgets. I can also do some cool animations with tweening the width and heights of the panels over time.

Feel free to use the NineSlice.as class however you want. If you use it or improve it in anyway, let me know!

Screenshot Saturday

Image


Some progress today on a fancy menu screen. Making a lot of use of my nine slice rendering class. I'll be posting an updated version of that soon!

Doodle Post

Image

A Flashpunk 9-Slice Object

A Flashpunk 9-Slice Object
As I've been working on this Global Game Jam game remake, I've been trying to come up with solutions for problems that I can hopefully reuse for more projects in the future. One of the things I've been thinking a lot about is managing and drawing the various user interfaces for the game. Even though I'm not quite sure how much UI stuff this game will need, I wanted to have some sort of solid base to start with so that I could get stuff up and running quickly.

One of the most basic core structures of drawing a cool UI (in my opinion!) is a 9-slice graphic object. What's a 9-slice graphic object?! Well, here's a quick example of one that I have working in Flashpunk right now.

Image

The box that is being drawn above the red player rectangle is a working example of my NineSlice class. It's being drawn from a source image of nine tiles. The source file has four tiles for the corners, four tiles for the sides, and one tile for the center. Here's what the source looks like (blown up 4x because it is tiny.)

Image

This is incredibly useful because it's now possible for me to draw stylized boxes for potential UI components at any size without having to draw each one individually. One thing that I wish that I had spent more time on in Offspring Fling is the UI for the menus, so in the future I want to make my menus and interfaces as awesome as they can be, and having some functions do a lot of the fancy work for me is a big step in that direction. Here's what it looks like right now: NineSlice.as

Here are some snippets of code from the example shown above:
//initial set up
private var nineSliceTest:NineSlice = new NineSlice(Assets.IMG_NINE_SLICE_TEST, 3, 3, 3, 3);
//in the entity's constructor
nineSliceTest.scrollX = nineSliceTest.scrollY = 0;
nineSliceTest.width = 40;
nineSliceTest.height = 40;
nineSliceTest.x = 50;
nineSliceTest.y = 50;
//in the entity's render function
nineSliceTest.render();
Right now this is a very rough first pass on this kind of thing. Ideally it would be some sort of Flashpunk graphic extension that would plug directly into the Flashpunk rendering system. For now it makes use of the Flashpunk Draw class, and some utility functions that I've written for myself. Feel free to use it or improve it, and if you end up improving it then let me know!

Dev Log: Some More Camera Stuff

Dev Log: Some More Camera Stuff
I'm feeling pretty exhausted today so this post will probably be pretty short. Last week I posted about working on some camera stuff for platforming in Flashpunk. I made a few adjustments to the way my camera worked based on some more stuff I observed from Mario World and Yoshi's Island.

Image

I changed around how some of the horizontal camera stuff works. Now you have some wiggle room before the camera starts to move at all horizontally. The look ahead also works slightly better than before. If you're pushing up against the side of the wiggle-area, the camera will slowly look ahead in the direction you're pushing. If you're moving in that direction, the speed in which it looks ahead increases so that you'll hopefully always be able to see what's coming down the line if you're moving fast.

The vertical movement is more or less the same. The camera only catches up to you when you're on a platform, or if you're pushing the margin of the screen with jumping or falling. The falling margin of the screen is much higher, since usually if you're falling you want to see a little bit downward. One thing I did change was the camera's natural target point in the y direction. Now if the camera thinks you're moving upward a lot, it will look above the player somewhat. If you're moving down though, it will look directly at the player again. Looking somewhat above the player ends up looking nice in most platformers because locking on in the center usually means showing 50% of the screen as solid ground with the most basic camera behavior.

I have run into some snags along the way... right now I need to figure out how to handle camera blocking better. Camera blockers are necessary for a game like this to hide secret areas, and I don't want to reveal them until the player actually crosses into the secret area. At the point in which the player crosses the blocker, the camera will then be unlocked and catch up to its target position again. This worked fine up until the point in which I made the player camera more complicated... I might have to do some tinkering to get it working just the way I want, but also in a clean and reusable way.

Okay that's all for now! (PS The Flashpunk website is still down, but once it comes back up all my links to it will work again! Also if you're looking for just the code, check out the Git repository.)