I moved to a new URL! Check it out!

posts tagged with: shaders

Dev Log: Game Jammin

Dev Log: Game Jammin
Over the weekend I went to a local game jam in Phoenix. I haven't jammed since November and this was another cool opportunity to put Otter to the test!

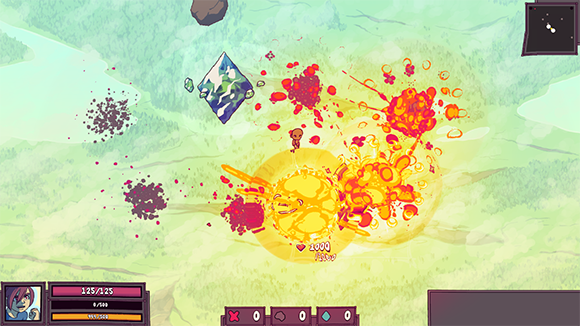
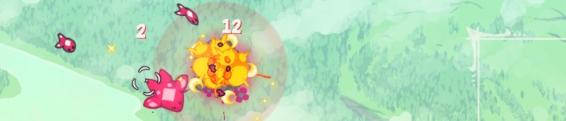
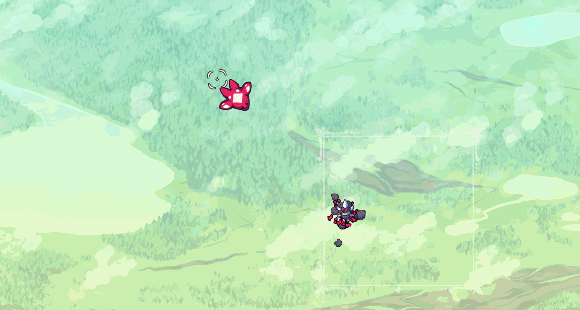
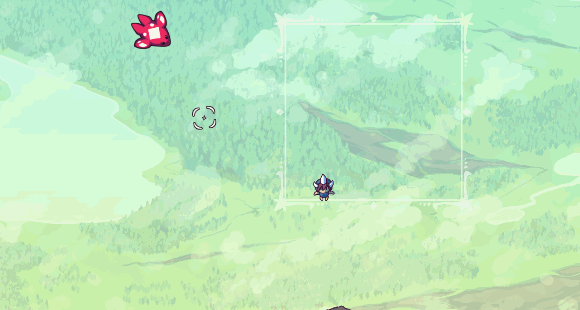
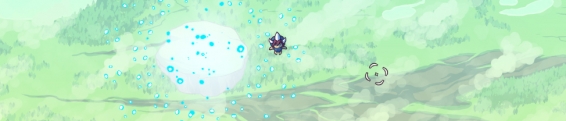
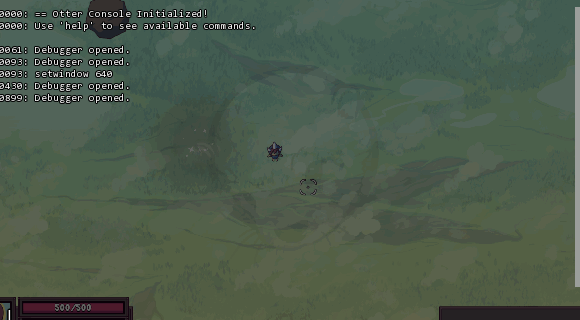
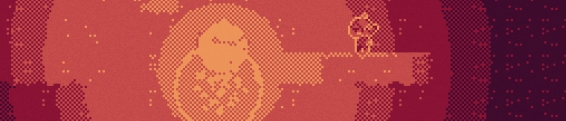
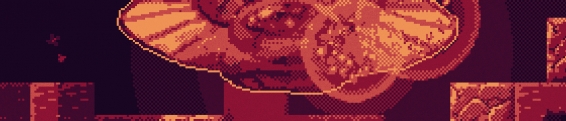
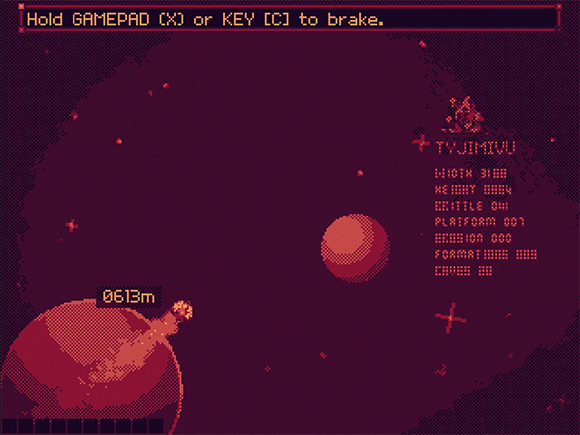
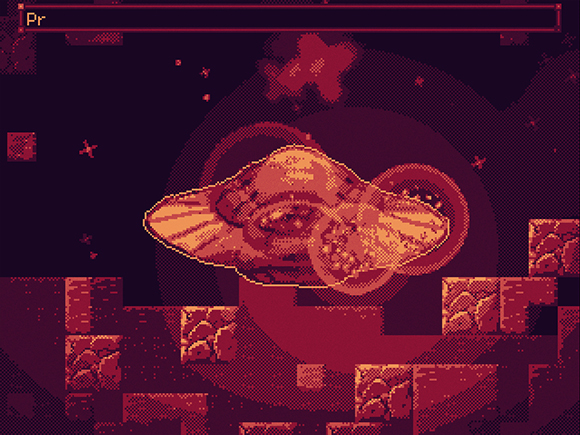
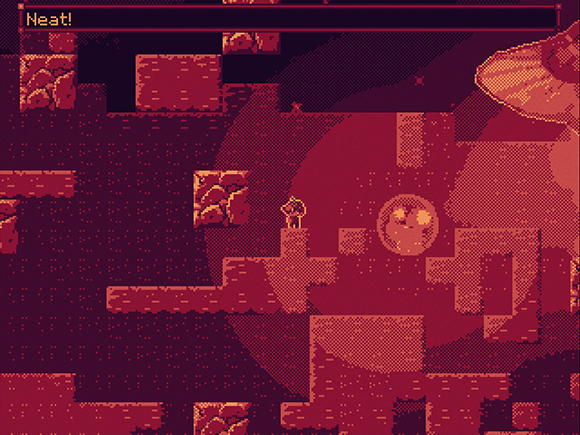
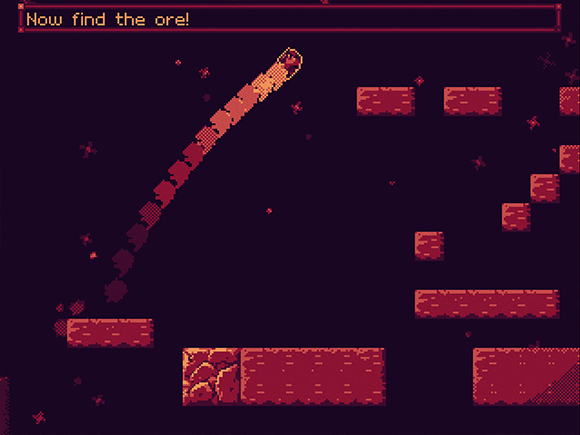
The game isn't quite ready for release, but here are a few screen shots of it for now:

Image


Image


Image


Image


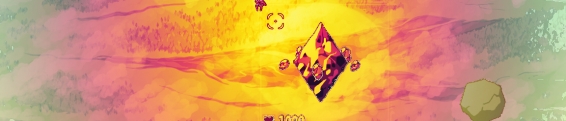
And you can see some of it in motion right here.

This jam I decided that I wanted to really limit myself in terms of art so I could spend more time on more stuff in the game. I wanted to restrict myself to a game boy palette, so my first thought was to go for a shader. I ended up getting a shader up and running really quickly that emulates sort of a game boy look. Here's the shader code:
#version 130
uniform sampler2D texture;
uniform sampler2D palette;
uniform float shift;
uniform float offset;

float rand(vec2 co){
return fract(sin(dot(co.xy ,vec2(12.9898,78.233))) * 43758.5453);
}

void main() {
vec2 pixpos = gl_TexCoord[0].xy;
vec4 pixcol = texture2D(texture, pixpos);

float gray = (pixcol.r + pixcol.g + pixcol.b) / 3;

gray = round(gray / 0.25) * 0.25;

gray += (rand(pixpos + offset) * 2 - 1) * 0.03;

pixcol = texture2D(palette, vec2(gray, shift));

gl_FragColor = pixcol * gl_Color;
}

The shader also does some extra stuff like randomly generates a very faint noise over the entire screen. I couldn't figure out how to make the noise scale with the screen though, so if you are playing with the screen scale at 2x or 4x or whatever the noise will still be every 1 pixel.

The shader also needs a palette to go with it that is passed in through the palette parameter. You can also shift the palette up and down on the texture. Here's the palette file I used:

Image


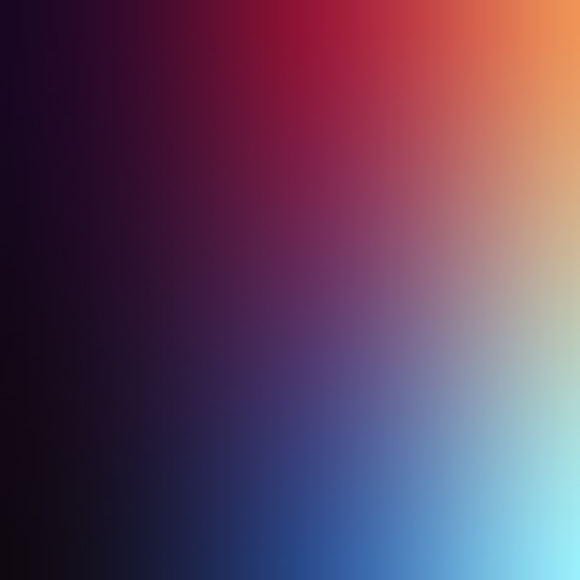
When the game starts it's using the palette from left to right on the very top of the image. The shift parameter in the shader can be used to read colors from anywhere on the y axis on the image, so if I want to make the game use the blue palette on the bottom I can set the shift to 1. (Texture coordinates are 0 to 1 in shader land.) The shader also reduces the amount of colors with some division and rounding.

The last thing I did to help out with the shader is add a full screen dither texture to the game. This is actually being rendered in the game and not in the shader. It's a very very faint texture of black and white pixels overlaid on the screen at an alpha of 10%. This will add a dithering look between all of the main colors of the palette. This idea was inspired by Dan Fessler's HD Index Painting tutorial. (Actually most of this shader was inspired by that tutorial!)

I think that covers everything with the shader. Hopefully soon I can release the game itself. Just need to fix some bugs and fix some sound issues first. I ended up getting awards in the technical, art, and design categories, and overall I got 2nd place at the jam which is pretty cool!

Dev Log: Shader Follow Up

Dev Log: Shader Follow Up
My last post went over some of my recent shader developments with displacement maps, and using gradient maps to recolor portions of the screen. I had a couple of questions of what exactly was going on behind the scenes with the render textures that I was using to tell the shader how to actually manipulate the image, so I thought I would address that now!

Here's an example image from the game with a lot of explosions going on:

Image


Each explosion has a shockwave ripple coming out of it which distorts the area around it. The explosion also changes the color of the screen around to a gradient map with pink and yellow. This makes it look like an intense heat, or something.

For reference, here's the shader again (it's been slightly modified since yesterday.)
uniform sampler2D texture;
uniform sampler2D displacementMap;
uniform sampler2D paletteMap;
uniform sampler2D gradientMap;

void main() {
// Get the pixels off of the maps.
vec4 displacementPixel = texture2D(displacementMap, gl_TexCoord[0]);
vec4 palettePixel = texture2D(paletteMap, gl_TexCoord[0]);

// Read the pixel from the displaced position.
vec2 pos = gl_TexCoord[0];
pos.x += (displacementPixel.r * 2.0 - 1.0) * 0.025;
pos.y -= (displacementPixel.g * 2.0 - 1.0) * 0.025;

// Get the displaced pixel.
vec4 pixel = texture2D(texture, pos);

// Proper grayscale conversion.
float gray = dot(pixel.rgb, vec3(0.299, 0.587, 0.114));

// Get the color from the gradient.
float gradientPos = mod(gray + palettePixel.g, 1);

// Get the actual color from the gradient.
vec4 gradientMapPixel = texture2D(gradientMap, new vec2(gradientPos, palettePixel.r));

// Mix the gradient with the pixel color based on the palette pixel.
pixel = mix(pixel, gradientMapPixel, palettePixel.a);

// Apply the final color multiplied by the gl color.
gl_FragColor = pixel * gl_Color;
}
From this point on there's going to be a lot of images and some hefty animated gifs, so I'll hide the rest of this post behind the read more button!

Dev Log: Shaders All Day

Dev Log: Shaders All Day
I've been taking an extended vacation in shader town lately, and so far I've been having a lot of fun! One of the things I was figuring out was how to take an image and remap all the colors to a gradient based on their luminosity (well, a sloppy way of estimating the luminosity.) This seems like a pretty powerful effect that could be used to really spice up effects. Yeah, I'm always thinking about how to make explosions better.

First I'll share the actual shader code that I'm working with right now. This is the shader that's being used for all of my full screen effects.
uniform sampler2D texture;
uniform sampler2D displacementMap;
uniform sampler2D paletteMap;
uniform sampler2D gradientMap;

void main() {
vec4 displacementPixel = texture2D(displacementMap, gl_TexCoord[0]);
vec4 palettePixel = texture2D(paletteMap, gl_TexCoord[0]);

vec2 pos = gl_TexCoord[0];
pos.x += (displacementPixel.r * 2.0 - 1.0) * 0.025 * displacementPixel.a;
pos.y -= (displacementPixel.g * 2.0 - 1.0) * 0.025 * displacementPixel.a;

// Get the displaced pixel.
vec4 pixel = texture2D(texture, pos);

// Proper grayscale conversion.
float gray = dot(pixel.rgb, vec3(0.299, 0.587, 0.114));

// Get the color from the gradient.
float gradientPos = mod(gray + palettePixel.g, 1);

vec4 gradientMapPixel = texture2D(gradientMap, new vec2(gradientPos, palettePixel.r));

// Mix the gradient with the pixel color based on the palette pixel.
pixel = mix(pixel, gradientMapPixel, palettePixel.a);

gl_FragColor = pixel * gl_Color;
}
Using Otter I can just apply this shader to the game's main Surface object and I'm ready to roll with special effects. This post is going to be image heavy, so I'll hide the rest of it behind the jump!

Dev Log: Shader Experiments

Dev Log: Shader Experiments
Since my break to work on the remaining bits of Otter I haven't really fallen back into the groove on working on my big game project yet. Yesterday I dedicated the day to playing around with shaders since I'm really interested in using them for all kinds of cool visual effects.

Image


This is what I ended up coming up with at the end of the day. First I was playing around with gradient maps for recoloring an image, and then I started to mess with displacement to make cool waves in the image. Finally I wanted to experiment with having a render texture that could be passed to the shader for dynamic effects.

Basically how this little program works is that there is the static image with a shader loaded. Then there's a Surface object that can be painted on with the mouse. The shader uses the texture from that Surface to affect the image in different ways.

Here's the full C# source:
using Otter;
using System;
using System.Collections.Generic;
using System.Linq;
using System.Text;

namespace ShaderTesting {
class Program {
static void Main(string[] args) {
var image = new Image("pic.jpg");
var game = new Game("ShaderZ", image.Width, image.Height);

game.FirstScene = new TestScene();

game.Start();
}
}

class TestScene : Scene {

Image image = new Image("pic.jpg");
Image circle = new Image("circle.png");
Surface distortion;

public TestScene() {
AddGraphic(image);
distortion = new Surface(image.Width, image.Height);
circle.CenterOrigin();
circle.Blend = BlendMode.Add;
AddGraphic(distortion);
circle.Alpha = 0.1f;
distortion.Visible = false;
distortion.AutoClear = false;
}

public override void Update() {
base.Update();

if (Timer % 30 == 0) {
try {
image.Shader = new Shader("../../shader.frag");
}
catch(Exception e) {
Console.WriteLine("Shader error:");
Console.WriteLine(e.Message);
}
image.Shader.SetParameter("gradient", new Texture("gradient.png"));
}
if (Input.MouseButtonPressed(MouseButton.Right)) {
distortion.Clear();
}
image.Shader.SetParameter("time", Timer);
image.Shader.SetParameter("distortion", distortion.Texture);
image.Shader.SetParameter("offset", Util.SinScale(Timer, 0, 1));

if (Input.MouseButtonDown(MouseButton.Left)) {
Draw.SetTarget(distortion);
Draw.Graphic(circle, MouseX, image.Height - MouseY);
Draw.ResetTarget();
}
}

public override void Render() {
base.Render();

Draw.Circle(MouseX - 15, MouseY - 15, 30, Color.None, Color.Red, 2);
}
}
}

And the GLSL shader source:
sampler2D texture;
sampler2D gradient;
sampler2D distortion;
uniform float offset;
uniform float time;
uniform float mixfactor;

void main() {
vec2 pos = gl_TexCoord[0];
vec2 distortColor = texture2D(distortion, pos);
pos.x += distortColor.r * (sin(time * 0.1 + pos.x * 10) * 0.05);
pos.y -= distortColor.g * (cos(time * 0.1 + pos.y * 10) * 0.05);
vec4 color = texture2D(texture, pos);

float gray = (color.r + color.g + color.b) / 3;

vec4 gradientColor = texture2D(gradient, vec2(gray, offset));

gl_FragColor = mix(color, gradientColor, distortColor.r + distortColor.g);
}

You can download everything here. Note that you'll have to give it a reference to Otter to compile and run it yourself.

Dev Log: Impact Effects

Dev Log: Impact Effects
Whoops, been kinda neglecting my poor blog for a week. I've been making some progress on my fancy game project though! Just have been forgetting to post about it.

Image


One of the things I tackled over the last couple of days was adding more visual effects for stuff like damage impacts. I want damage to feel over the top juicy at all times so that every impact is really felt by the player. The effect I ended up with for damage impacts is an inverted flash combined with some red colored mixing and additive blending.

Image


Right now I'm using one utility shader that has a bunch of parameters on it for various effects. Check it out:
#version 120
uniform sampler2D texture;
uniform sampler2D noiseTexture;
uniform vec4 overlayColor;
uniform vec4 additiveColor;
uniform vec4 subtractiveColor;
uniform float overlayNoise;
uniform float inverted;
uniform float noiseX;
uniform float noiseY;

void main() {
//get color of this pixel
vec2 pixpos = gl_TexCoord[0].xy;
vec4 pixcol = texture2D(texture, pixpos);

vec4 outcol = abs(inverted-pixcol);
outcol.a = pixcol.a;

//mix in the overlay color
outcol = mix(outcol, overlayColor, overlayColor.a);

//add the additive color
outcol += additiveColor * additiveColor.a;

//subtract the subtractive color (DUH)
outcol -= subtractiveColor;

vec4 noiseColor = texture2D(noiseTexture, mod(pixpos, 1) + vec2(noiseX, noiseY));
outcol = mix(outcol, noiseColor, overlayNoise);

//reset alpha to prevent coloring transparent pixels
outcol.a = pixcol.a;

//output the final color
gl_FragColor = outcol;
}
I'm still learning the ins and outs of shaders so this probably isn't the best way to do this, but for now it seems to be working out fine.

Along with this shader there is some code in my "Combatant" component to control the shader. The Combatant has a timer that is set whenever it takes damage. This timer is then used to control various parameters on the shader. Every 2 frames the image is inverted using the shader. When the image is inverted there's a red additive color blend applied to the image, and when the image is not inverted there is a normal red color mix applied. The intensity of the color mix is determined by the timer. It starts very intense then fades away.

On top of that another texture is blended with the image. The other texture is just a simple image of generated noise. I'm not totally sure why, but for some reason I like the noise texture along with the rest of the effects. It kind of represents a disruption to the target taking damage, or something poetic like that.

Last but not least the image also shakes around a bit. This is something I first noticed a lot while playing Street Fighter 4. An action freeze along with sprite shaking is an incredibly useful way to convey an intense impact.

Here's the little blurb of code that handles the effects for Combatants
//Handle graphics
foreach (var img in Images) {
var overlay = Util.ScaleClamp(StunEffect, 0, StunEffectMax, 0, 0.5f);
var color = new Color(Color.Black) { A = overlay };
var addColor = new Color(StunColor) { A = overlay };

img.Shader.SetParameter("overlayNoise", overlay * 0.5f);
img.Shader.SetParameter("noiseX", Rand.Float(0, 0.25f));
img.Shader.SetParameter("noiseY", Rand.Float(0, 0.25f));

if (StunEffect > StunEffectMax * 0.25f) {
addColor.A = 0.5f;
color = G.Colors.Dark;
color.A = 0.25f;
img.Shader.SetParameter("inverted", StunEffect % 4 > 1 ? 1 : 0);
}
else {
img.Shader.SetParameter("inverted", 0);
}

img.Shader.SetParameter("overlayColor", color);
img.Shader.SetParameter("additiveColor", addColor);

img.Shake = Util.ScaleClamp(StunEffect, 0, StunEffectMax, 0, 30);
}
Along with the impact effects the Bullet entities have an impact effect to help show damage. If bullets hit something and deal damage they spawn a small red and yellow explosion, and if they don't do damage then the particle is blue and cyan. This is something I saw when I played a lot of Thunder Force III as a kid!

Dev Log: Some Shaders

Dev Log: Some Shaders
One of the things I miss about working in FlashPunk and working with a bunch of bitmaps and blitting to the screen is the super easy color overlay blending. FlashPunk had an Image blending mode called Tint and it could be used in place of Multiply and it is amazing for doing effects like fading an entire sprite to a specific color. The world of rendering quads and triangles I don't have such a luxury, but I do have shaders.

I've been working on the building islands animation, and here's a really fast version of it:

Image


At the end of it when the island pops out it's silhouetted with solid white. The white fades to cyan, and also fades back to the normal art at the same time. To get this effect I used a simple shader to handle a color overlay.
uniform sampler2D texture;
uniform vec4 overlayColor;

void main() {
vec4 pixcol = texture2D(texture, gl_TexCoord[0].xy);
vec4 outcol = mix(pixcol, overlayColor, overlayColor.a);
outcol.a = pixcol.a;
gl_FragColor = outcol;
}
I also use this code for enemies as well. When they get hit they turn red for a brief moment. I use code in the C# end to determine the color and intensity of the overlay and pass it along to the shader.
var overlay = Util.ScaleClamp(Combatant.Stun, 0, Combatant.StunMax, 0, 1);
var color = new Color(1, 0.2f, 0.1f, overlay);

ImageSpineAnim.Shader.SetParameter("overlayColor", color);
Soon I'll probably make some sort of system that allows me to easily add a bunch of color overlays to the shader and automatically figure out the final color for the shader to use. I'll probably also use the shader for a bunch of different effects down the road.