


Dev Log: Shaders All Day
I've been taking an extended vacation in shader town lately, and so far I've been having a lot of fun! One of the things I was figuring out was how to take an image and remap all the colors to a gradient based on their luminosity (well, a sloppy way of estimating the luminosity.) This seems like a pretty powerful effect that could be used to really spice up effects. Yeah, I'm always thinking about how to make explosions better.
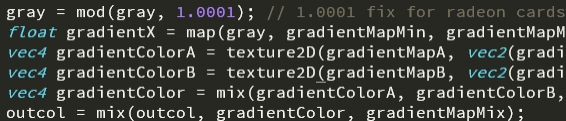
First I'll share the actual shader code that I'm working with right now. This is the shader that's being used for all of my full screen effects.
Using Otter I can just apply this shader to the game's main Surface object and I'm ready to roll with special effects. This post is going to be image heavy, so I'll hide the rest of it behind the jump!
This shader is handling two major special effects. One is a displacement effect which can be used for ripples, shockwaves, and other neat effects like a stained glass look. The other effect is a gradient map mask effect which allows me to specify parts of the screen that have their colors remapped to a specified palette.
Both of these effects make use of a behind-the-scenes Surface in Otter. I can draw graphics directly to these hidden surfaces and then pass them into the shader via a texture parameter. Then I can use the color data from the sampled pixels in the shader.
The displacement effect uses pixel data to determine the amount of displacement. A red pixel on the displacement texture will move a pixel horizontally on the game's surface depending on how red it is. A green pixel will do the same thing but vertically. Since this is 2D displacement, blue doesn't do anything. The alpha of the pixel also determines how much of an offset there is in the displacement.
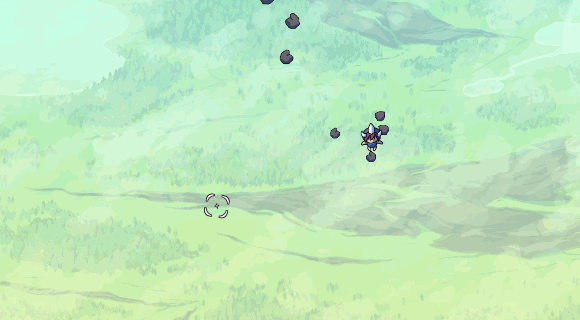
This allows me to do stuff like this,

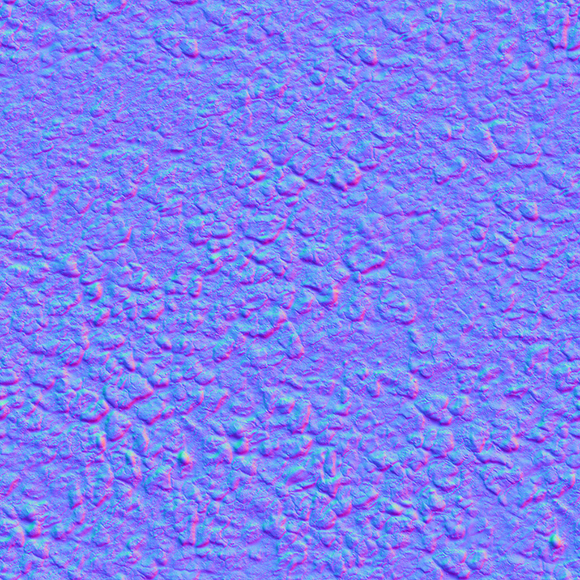
In that example the texture that was used for the displacement is a random normal map sample that I grabbed off of Google.
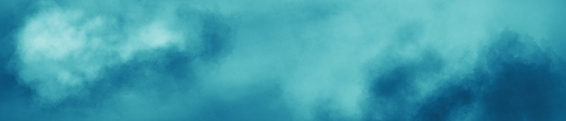
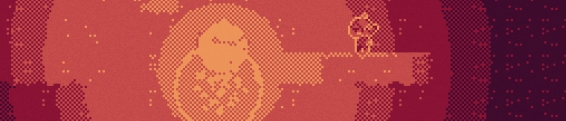
That's just a static example. What happens if when I use a Surface to pass in a texture that is being drawn on dynamically? Then I can do stuff like this,
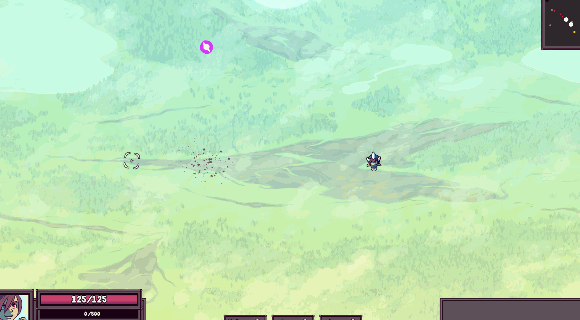
You can see some wave like effects around the explosions now. I haven't quite figured out how to get a proper looking shockwave coming out of the center of the explosion yet though... so for now you get to see wobbling of space time.
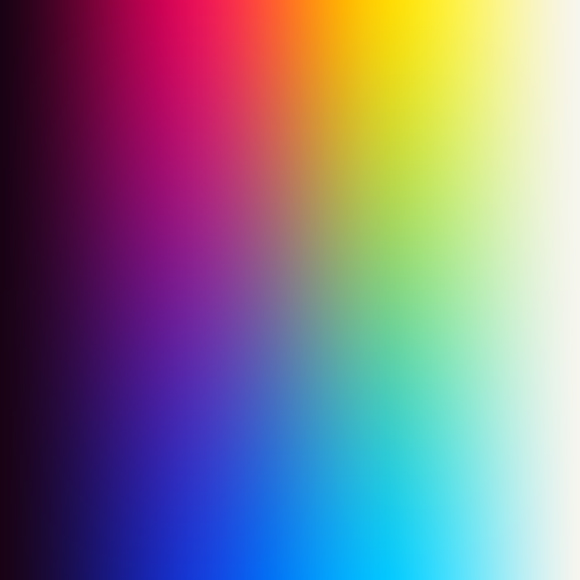
Gradient maps are awesome and I love using them in Photoshop, so I've been really excited to get them working with shaders. Basically what I'm looking to do is take colors on the screen and remap them to new colors from a gradient texture. Here's a quick look at a gradient texture I'm using for some experiments right now.
It's pretty easy to get a gradient map working on an entire texture, but what I really wanted to look into was doing gradient maps on only specific parts of the screen. Using what I learned with displacement maps, I wanted to apply the same concepts.
I'm using a different Surface in Otter. I'm rendering images to that surface and passing the texture data to the shader. The shader then looks at the pixels of that surface to figure out what to do in regards to the gradient remap.
First the shader figures out how "gray" the pixel is. Then that determines what color on the gradient to use. Since the gray is 0 to 1, I can just get the pixel off of the gradient that horizontally maps to that. For example, if the gray is 0, then I sample the left most pixel of the gradient (usually the darkest color.) If the gray is 1, I sample the right most, and 0.5 is right in the middle.
I also use the green pixel data from the palette mapping surface to determine an offset for the horizontal position of the gradient. I figure this can be used for some pretty cool effects if I can cycle the gradient over an image.
To determine which part of the gradient to use I sample the red pixel on the palette mapping surface. This is why my gradient image is actually a square and not just a horizontal strip. The red pixel will determine the vertical position on that image to sample, so I can use many different gradients just coming from one texture depending on how red the sampled pixel is.
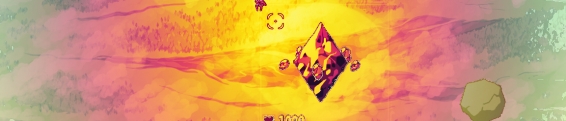
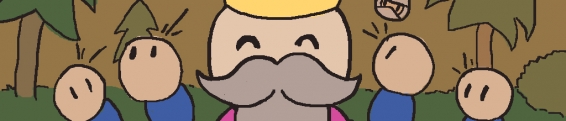
Enough babbling about that, check out this sort-of accidental effect that I was experimenting with,
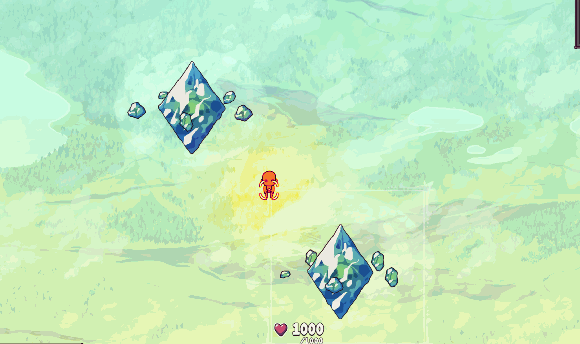
Pretty rad! Although as you can see right now the hud is also caught up in the madness of the displacements and the color mapping. I'll fix this later by placing the hud on a different surface that wont be effected by shaders.
That's all for now!
First I'll share the actual shader code that I'm working with right now. This is the shader that's being used for all of my full screen effects.
uniform sampler2D texture;

uniform sampler2D displacementMap;

uniform sampler2D paletteMap;

uniform sampler2D gradientMap;


void main() {

	vec4 displacementPixel = texture2D(displacementMap, gl_TexCoord[0]);

	vec4 palettePixel = texture2D(paletteMap, gl_TexCoord[0]);


	vec2 pos = gl_TexCoord[0];

	pos.x += (displacementPixel.r * 2.0 - 1.0) * 0.025 * displacementPixel.a;

	pos.y -= (displacementPixel.g * 2.0 - 1.0) * 0.025 * displacementPixel.a;


	// Get the displaced pixel.

	vec4 pixel = texture2D(texture, pos);


	// Proper grayscale conversion.

	float gray = dot(pixel.rgb, vec3(0.299, 0.587, 0.114));


	// Get the color from the gradient.

	float gradientPos = mod(gray + palettePixel.g, 1);


	vec4 gradientMapPixel = texture2D(gradientMap, new vec2(gradientPos, palettePixel.r));


	// Mix the gradient with the pixel color based on the palette pixel.

	pixel = mix(pixel, gradientMapPixel, palettePixel.a);


	gl_FragColor = pixel * gl_Color;

}
This shader is handling two major special effects. One is a displacement effect which can be used for ripples, shockwaves, and other neat effects like a stained glass look. The other effect is a gradient map mask effect which allows me to specify parts of the screen that have their colors remapped to a specified palette.
Both of these effects make use of a behind-the-scenes Surface in Otter. I can draw graphics directly to these hidden surfaces and then pass them into the shader via a texture parameter. Then I can use the color data from the sampled pixels in the shader.
Displacement
The displacement effect uses pixel data to determine the amount of displacement. A red pixel on the displacement texture will move a pixel horizontally on the game's surface depending on how red it is. A green pixel will do the same thing but vertically. Since this is 2D displacement, blue doesn't do anything. The alpha of the pixel also determines how much of an offset there is in the displacement.
This allows me to do stuff like this,
In that example the texture that was used for the displacement is a random normal map sample that I grabbed off of Google.
That's just a static example. What happens if when I use a Surface to pass in a texture that is being drawn on dynamically? Then I can do stuff like this,
You can see some wave like effects around the explosions now. I haven't quite figured out how to get a proper looking shockwave coming out of the center of the explosion yet though... so for now you get to see wobbling of space time.
Gradient Maps
Gradient maps are awesome and I love using them in Photoshop, so I've been really excited to get them working with shaders. Basically what I'm looking to do is take colors on the screen and remap them to new colors from a gradient texture. Here's a quick look at a gradient texture I'm using for some experiments right now.
It's pretty easy to get a gradient map working on an entire texture, but what I really wanted to look into was doing gradient maps on only specific parts of the screen. Using what I learned with displacement maps, I wanted to apply the same concepts.
I'm using a different Surface in Otter. I'm rendering images to that surface and passing the texture data to the shader. The shader then looks at the pixels of that surface to figure out what to do in regards to the gradient remap.
First the shader figures out how "gray" the pixel is. Then that determines what color on the gradient to use. Since the gray is 0 to 1, I can just get the pixel off of the gradient that horizontally maps to that. For example, if the gray is 0, then I sample the left most pixel of the gradient (usually the darkest color.) If the gray is 1, I sample the right most, and 0.5 is right in the middle.
I also use the green pixel data from the palette mapping surface to determine an offset for the horizontal position of the gradient. I figure this can be used for some pretty cool effects if I can cycle the gradient over an image.
To determine which part of the gradient to use I sample the red pixel on the palette mapping surface. This is why my gradient image is actually a square and not just a horizontal strip. The red pixel will determine the vertical position on that image to sample, so I can use many different gradients just coming from one texture depending on how red the sampled pixel is.
Enough babbling about that, check out this sort-of accidental effect that I was experimenting with,
Pretty rad! Although as you can see right now the hud is also caught up in the madness of the displacements and the color mapping. I'll fix this later by placing the hud on a different surface that wont be effected by shaders.
That's all for now!


Comments
> I'll fix this later by placing the hud on a different surface that wont be effected by shaders.
Or maybe you shouldn't. It really adds to the immersion =)
A333: for the hud it really depends on how crazy I go. If the hud is still readable enough I'll keep the effects on it. ;D
How did you learn to program shaders? did you have a great mathemathic background?
Thank you
PS: Could you please share how you did the last effect? :D
I have some math, but I wouldn't say I have a strong math background. A lot my learning shaders took just simple trial and error.
Unfortunately it's been a very long time since I've done that last effect so I'm unsure what the actual code was. I believe I was applying a gradient map to the screen with a mask. I assigned a gradient map that would recolor the screen with fiery colors, and how much that gradient map was applied was determined by a render texture that was black with white being drawn to it. How much white was in each pixel would determine how much effect the gradient map would have on the final rendered pixel. Not sure if that makes any sense though, sorry!
Post your comment!