I moved to a new URL! Check it out!

posts tagged with: programming

Asset Class Generator Update

Asset Class Generator Update
Just a quick post to say I've updated my Visual Studio Asset Class Generator with some bug fixes here and there. Download the new version right here.

There were some issues with duplicate file names, and also files with more than one period in the name would destroy it so I've now set it to ignore those files. I've also cleaned up the code that the generator writes.

The source code for the updated version is also now available here so you can feel free to modify it to your hearts content!

Google Spreadsheet Sync

Google Spreadsheet Sync
Have you ever wanted to take the contents of a Google Spreadsheet and drop it right into your game project? So have I! That's why I made a tool that will take the contents of a Google Spreadsheet and turn it into a C# code file full of data!

Demo


Let's say we have a spreadsheet full of data for our video game written in C#, and it looks something like this.

Image


The resulting output of that spreadsheet will be this.
class Sheets {

public static Dictionary<string, CharactersRow> Characters = new Dictionary<string, CharactersRow>() {
{"Adventurer", new CharactersRow() {
Name = "Adventurer",
Health = 100,
Magic = 100,
Attack = 100,
Defense = 100,
Speed = 100,
VictoryPhrase = "Nice try, \"chump!\"",
FailurePhrase = "Ah... well done..."
}},
{"Thief", new CharactersRow() {
Name = "Thief",
Health = 75,
Magic = 100,
Attack = 100,
Defense = 50,
Speed = 200,
VictoryPhrase = "I take what I want!",
FailurePhrase = "Not fair!"
}},
{"Assassin", new CharactersRow() {
Name = "Assassin",
Health = 100,
Magic = 50,
Attack = 200,
Defense = 50,
Speed = 100,
VictoryPhrase = "You're lucky to be alive.",
FailurePhrase = "How could you defeat me?!"
}}
};

public class CharactersRow {
public string Name;
public int Health;
public int Magic;
public int Attack;
public int Defense;
public int Speed;
public string VictoryPhrase;
public string FailurePhrase;
}

public static Dictionary<string, WeaponsRow> Weapons = new Dictionary<string, WeaponsRow>() {
{"Bronze Sword", new WeaponsRow() {
Name = "Bronze Sword",
Attack = 45,
Defense = 0,
Type = WeaponType.Sword,
Value = 100,
CanUpgrade = true
}},
{"Silver Bow", new WeaponsRow() {
Name = "Silver Bow",
Attack = 20,
Defense = 0,
Type = WeaponType.Bow,
Value = 250,
CanUpgrade = true
}},
{"Fire Wand", new WeaponsRow() {
Name = "Fire Wand",
Attack = 35,
Defense = 15,
Type = WeaponType.Staff,
Value = 400,
CanUpgrade = false
}},
{"Lasso", new WeaponsRow() {
Name = "Lasso",
Attack = 30,
Defense = 0,
Type = WeaponType.Whip,
Value = 150,
CanUpgrade = true
}}
};

public class WeaponsRow {
public string Name;
public int Attack;
public int Defense;
public WeaponType Type;
public int Value;
public bool CanUpgrade;
}
}

With a class like that in my project now it becomes very simple to get data from the spreadsheet with the key of the row (the first column.)
var charName = "Adventurer";
var health = Sheets.Characters[charName].Health;
var victoryPhrase = Sheets.Characters[charName].VictoryPhrase;
Console.WriteLine(victoryPhrase);

Download


Download GoogleSpreadsheetSync.zip (0.02MB)

Usage


I use Visual Studio, so I can only really tell you about that.

It's easiest to set this up as an EXTERNAL TOOL in Visual Studio.
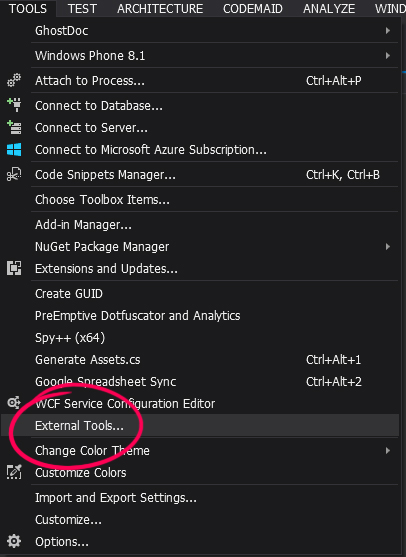
* In Visual Studio go to the Tools menu at the top, select "External Tools..."

Image

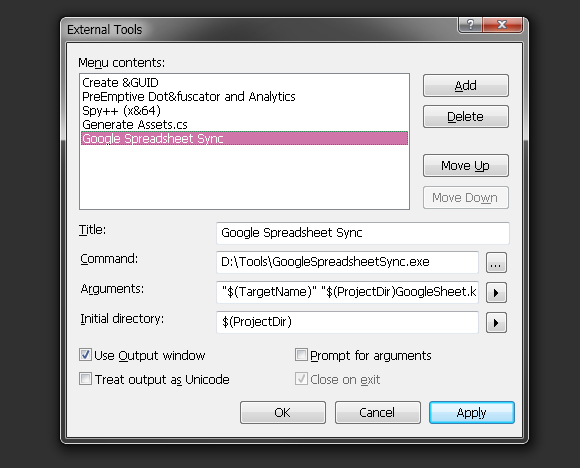
* Click "Add"
* Name it something like "Google Spreadsheet Sync"
* For Command, press the "..." button to the right and find the exe.
* For arguments you can use "$(TargetName)" "$(ProjectDir)GoogleSheet.key"
* Include the quotes in those arguments!
* For Initial Directory put $(ProjectDir)
* No quotes in that one.
* Below that check the "Use Output Window" option.

Image


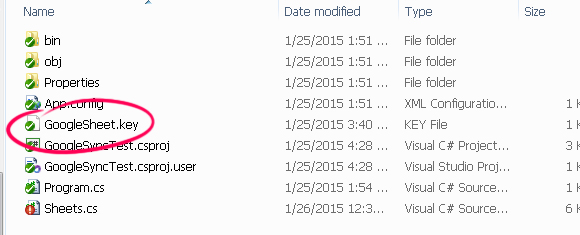
Before you run it though you're going to need to create a GoogleSheet.key file. That file should only contain google spreadsheet key.

For this example here's a URL to a published google spreadsheet: https://docs.google.com/spreadsheets/d/11Ia3wr-Pon1180M0_KRR1hywEITLn_P1BoUedbNQeqw/pubhtml

The key is that big long section: 11Ia3wr-Pon1180M0_KRR1hywEITLn_P1BoUedbNQeqw So in this example the contents of your GoogleSheet.key file should only be:

11Ia3wr-Pon1180M0_KRR1hywEITLn_P1BoUedbNQeqw

Save the file as GoogleSheet.key inside your root project folder. (So probably the same folder as your Program.cs)

Image


You should be all set to now run it from Visual Studio! It should appear in your Tools menu. You can even set a keyboard shortcut for it later if you want.

Run the tool from the Tools menu and what should happen is a Sheets.cs file is generated with all the data from your spreadsheets.

Image


Source


Of course it would be way better if you're able to take this tool and craft it into your own needs, so here's the source code!

I've started a public repository where I'll keep any useful tools I create right here.

Trouble?


If you run into any trouble feel free to post a comment and I'll try to help! Or you can reach me at hi@kpulv.com, or the contact form at the bottom of my site.

Dev Log: Event Queues Everywhere

Dev Log: Event Queues Everywhere
I've been working on a little prototype involving turn based combat. I'm not quite 100% ready to dive back into Stratoforce yet, and I had this idea gnawing at me and I just have to get it out of my system. What exactly is the idea? Well I can't say what it is yet, but if it works out then I'll talk more about it!

Since it is based around turn based combat I had to figure out how exactly that works. I'm so used to programming things that happen all in real time that suddenly going into a turn based game makes absolutely no sense to my brain. At first I had these huge state machines that were incredibly clunky, then I transformed it all into events that can be placed into a magical event queue.

Here's a simple class that can be dropped into Otter that is an event queue manager. It was whipped up very quickly so there might be some slight issues to debug. Check it out:
/// <summary>
/// A Component to manage and process queue of events
/// </summary>
class EventQueue : Component {

public List<EventQueueEvent> Events = new List<EventQueueEvent>();
public EventQueueEvent CurrentEvent { get; private set; }

bool isFreshEvent = true;

public EventQueue() {

}

public bool HasEvents {
get {
return Events.Count > 0;
}
}

public void Add(params EventQueueEvent[] evt) {
Events.AddRange(evt);
}

public void Push(params EventQueueEvent[] evt) {
Events.InsertRange(0, evt);
}


public override void Update() {
base.Update();

if (CurrentEvent == null) {
NextEvent();
}

while (CurrentEvent != null) {
if (isFreshEvent) {
isFreshEvent = false;
CurrentEvent.EventQueue = this;
CurrentEvent.Start();
CurrentEvent.Enter();
}

CurrentEvent.Update();
CurrentEvent.Timer++;

if (CurrentEvent.IsFinished) {
isFreshEvent = true;
CurrentEvent.Exit();
CurrentEvent.EventQueue = null;
Events.Remove(CurrentEvent);
NextEvent();
}
else {
break;
}
}

}

void NextEvent() {
if (Events.Count > 0) {
CurrentEvent = Events[0];
}
else {
CurrentEvent = null;
}
}
}

class EventQueueEvent {

public EventQueue EventQueue;
public int Timer = 0;
public bool IsFinished { get; private set; }

public void Start() {
IsFinished = false;
Timer = 0;
}

public virtual void Enter() {

}

public virtual void Update() {

}

public virtual void Exit() {

}

public void Finish() {
IsFinished = true;
}
}

This is sort of similar to just a very simple behavior tree (see Kodo for more advanced stuff!) Basically what happens is there's a list of events that all need to be run. The current event is run during the Update, and if it's finished then it's removed and now the next one starts up. You can both Add and Push events into the Queue. Push will insert an event at index zero so it will be the next thing to run. To make events just make classes that extend EventQueueEvent!

So I have events like "Damage" "ActorDefeated" "ChooseTarget" "TakeActions" and more. It becomes very easy to manage when things are broken up into separate classes like this! This is actually also giving me ideas on how to run cutscenes in more real time action type games as well. Maybe it will be of some use to you!

Dev Log: Game Ideas and Toggl

Dev Log: Game Ideas and Toggl
I've been back in my programmers seat for the past couple days and the rust is pretty real. I'm getting back into Otter and pushed some minor updates to it that should fix some issues I've been having with it. I wasn't liking some of the finer details of how Entities were being added to Scenes, and how Components were being added to Entities, but I think I have that figured out now.

To get back into the programming saddle I've decided to just mess around with a prototype for now. I don't know much about it yet, but I'll say that I'm currently making a turn based battle system for it. Who knows what that could mean! If this idea turns out to be cool though I'll have more info the share about it.

One thing I'm trying now is using toggl to track how I spend my time through the day. I think one of my anxieties about being productive comes from not exactly knowing how much time I spend doing stuff. Right now I just have it set up to track exercise, game dev, writing, and drawing. Those are the broad strokes of what I care about, and I might end up breaking down those categories even futher depending on how this experiment goes.

I still have my co op game Super Sky Sisters to finish and release soon, and then there's Global Game Jam coming up and I don't know if I'm going to make a completely new game there, but I'm definitely going to be jamming regardless either on a current project or a new project.

Dev Log: Otter Updates

Dev Log: Otter Updates
Over the past week or so I've been doing some various changes to Otter as I'm still trying to figure out the best way to add Entities to Scenes, and Components to Entities. Currently in the dev branch an Entity's Added function is not called until the Entity is actually added to the scene at the beginning of the next update, and now for Components their Added function is not called until it is actually added to the Entity which can occur at the start of each update.

For now I just did some minor updates and changes

* Changed how Entity.IsInScene works. Now IsInScene will return true if the Entity is in a scene, or queued up to be added to a scene.

* Added SetColor to the Color class. This is useful for changing all of the values on a color especially when using another color as the source values. Mostly used in cases where you don't want to Copy and create a new Color instance.

* Finally figured out how to get colliders to have separate constructors when using Enums as tags. Now you should be able to specify Enums as tags in the constructors of all colliders.

Moving the Console Window

Moving the Console Window
Just wanted to share a quick tidbit of code that's useful for making a game with a console window for debug information. A lot of times I want to launch my game and have the console window on a different monitor, or just out of the way in general. It gets super annoying to have to move it over every time I launch a game for debugging, but then I found that I can move it with programming!

I'm going to be honest and say I don't totally understand how this works. It uses DllImport to get some functions from the user32.dll in Windows and then uses those to move the window around... I think? It should be noted that this probably only works for Windows.
class Program {
static void Main(string[] args) {
IntPtr handle = FindWindowByCaption(IntPtr.Zero, Console.Title);
MoveWindow(handle, -700, 50, 1000, 1100, true);

Core.Game.Start(); // Start the Otter game
}

[DllImport("user32.dll", EntryPoint = "FindWindow", SetLastError = true)]
public static extern IntPtr FindWindowByCaption(IntPtr zeroOnly, string lpWindowName);

[DllImport("user32.dll", SetLastError = true)]
internal static extern bool MoveWindow(IntPtr hwnd, int X, int Y, int nWidth, int nHeight, bool bRepaint);
}

I use functions to find the console window by it's name which can be accessed through the Console class in .net, and move the window by its handle. I give it a negative X coordinate because that pushes it onto my left monitor, so now every time I launch the game my console window appears and immediately gets pushed over to the left monitor. Neat!