I moved to a new URL! Check it out!

posts filed under: general

Dev Log: Enemy Wave HUD

Dev Log: Enemy Wave HUD
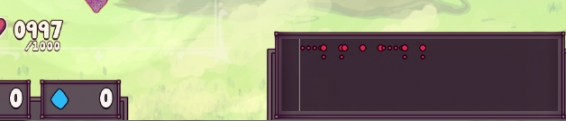
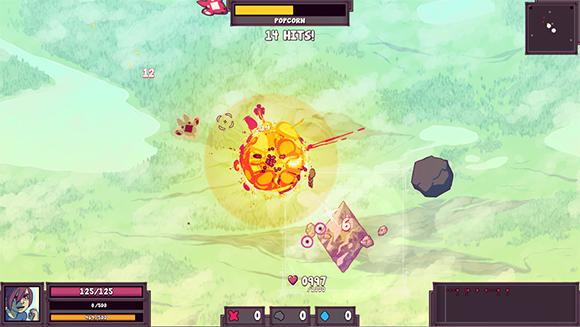
Here's something that has been on my task list since forever: showing incoming enemy waves on the HUD! Originally the bottom right spot was going to be something different, but for now the incoming wave information felt like it was more important than anything else that could be there.

Image


Now you can see how many enemies are going to be coming at you in the future. The little blips on the hud scroll from right to left as time marches on.

Image


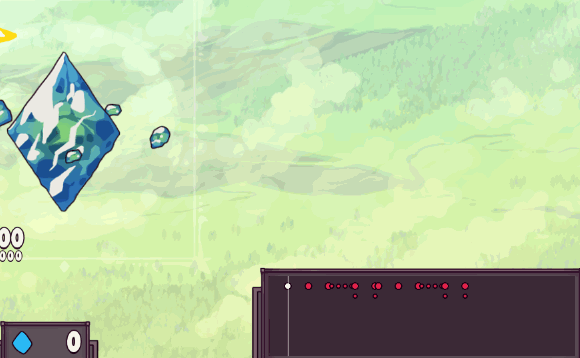
The enemies are arranged vertically depending on which spawn point they're coming from. I'm not sure how much information will be available to the player from here, but for now you can tell the size of the enemy and how many are coming up. I feel like this took me way too long to figure out, and I'm still not 100% happy with how I implemented it, but hey it works!

Dev Log: Overworlds

Dev Log: Overworlds
Getting back into the swing of game development has been a little tougher than I thought. Especially since July isn't exactly going to be a calm month for me to really dig into stuff. This 4th of July weekend is pretty busy, and I'm still right in the middle of it. After I'm heading up to EVO with a bunch of folk, and then I'm spending some time on the east coast after that. Traveling and getting work done doesn't really go hand in hand for me, so hopefully I can still salvage some time to get some game development in.

Anyway, my recent developments have lead me into making some sort of overworld map for my game. As I started to work on it, I quickly realized that I have no clue what I'm doing. I haven't really worked on anything like this before, and I'm slowly figuring out how to properly structure and manage it all.

Image


Basically the map screen is going to be some kind of turn based system that will determine what kind of encounter you go into next. The player will be able to choose where to go with their character, and there will also be enemy forces moving about in the area attacking things. The main issue I have right now is that I think I know how I want everything to work, but I have no idea how to code it.

I've never done any sort of turn based anything before, so I've been spending some time researching the internet for any leads. I found a few quick examples, but not really any sort of examples that come with source code to look at. I find it very difficult to go from an abstract concept to actual code, and a lot of times these examples or tutorials I find just explain the broad concepts of a system and don't really dig into the details which is where I always get lost... but hopefully with enough just messing around in a code window I can stumble onto the right answer.

More Web Resources

More Web Resources
My break from game development ended up lasting a little bit longer than I expected, but I had a good vacation in the world of web design and development. Unfortunately the stuff I worked on is totally top secret, and will be for a little while still, but when it comes time to finally reveal it I'll be sure to post about it here.

There were a few more things that I learned or picked up that came in handy during this last project and I thought I would just share a few of them again.

Tumblr Custom Theme Documentation
This lastest web project involved using tumblr as the content management system. I haven't done any work with tumblr before, but it turned out to be pretty straight forward and overall really easy to work with. Unlike Wordpress I never have to even venture into php territory. Tumblr seems to use some kind of built in templating system that takes care of everything behind the scenes. The official documentation on how to build a tumblr theme actually ended up being the best resource for getting started on it. A lot of the other tutorials I found on theme building were already outdated, so I just stuck to using control-f on the documentation whenever I needed to know something.

Tumblr Boilerplate
This is a quick and simple tumblr theme that implements all of the essential tags. This was a great place to get started and see how the various tags work along side some HTML and CSS. There was one guide that recommended starting with this, and I used it as a guide when I was starting on a custom theme.

Open Graph Protocol
If you want posts to be shared around properly on Facebook then having open graph meta tags in your HTML is essential. You're able to define things like the preview image, description, and title of your articles, which can be very important for when your awesome web page finally goes viral with all the kids. Facebook and other social media things can parse some things from your site automatically, but sometimes the layout of your site will cause it to parse the wrong things so these tags are a way to overcome that.

Social Media Templates
Related to the Open Graph tags, here are templates that cover the rest of the core social media tags. The meta tags for Twitter and even Google+ are available here to copy and paste into your web zone. Once again just useful for controlling what info shows up when people share your site across various social media sites.

Tumblr Static File Upload
When working with a custom tumblr theme you have two main options when it comes to hosting resources. You can either host them all remotely on a separate web server, or you can just upload all of the files to tumblr and have them worry about it. I found that my work flow was best when using a remote server for awhile, and then when things were more concrete I migrated over to the tumblr server. Using the tumblr static file upload you can host all of your files directly on tumblr, but it comes more of a pain to modify and reupload files (like css, font files, images, etc.) Ultimately I think using tumblr's servers for the final product is the best bet.

Firefox Cross Domain Font Fix
This one is pretty technical, but is super important when it comes to using the @font-face properties in CSS with a custom tumblr theme. Firefox cannot load fonts across domains without explicit permission from the host domain. Since the tumblr servers do not have this permission properly implemented, any custom fonts you try to load with the @font-face property will just not load on Firefox. Apparently this is the correct behavior, but kind of annoying since Chrome doesn't seem to care at all where fonts come from. The fix is simple enough though. By encoding fonts as base64 data directly into the style sheet Firefox is able to load the font no problem.

I think that's all for now! Hopefully today I can dig back into game development work, but I had a lot of fun brushing up on the latest web development action.

Side Trip to Web Design Land

Side Trip to Web Design Land
Things have been pretty quiet around here for a couple of days! I'm still working on video games, but recently I decided to take up some (hopefully) quick web design work! Although I can't share the details of what I'm working on, I can share some resources that came in handy for prepping me for the new world of web design.

My work flow for sites is terribly outdated in the modern world where 55% of web traffic apparently comes from mobile devices. Then on top of that, some desktops are now reaching resolutions of 2000+ horizontal pixels with retina displays and just plain ole huge monitors. The web is always changing, and it has changed a lot since I've really buckled down for a design project.

Responsive design is all the rage now, and my old work flow of mocking up an entire website in Photoshop, slicing it up into separate images, and reassembling it so it's pixel perfect just no longer applies to how modern sites are built. Now sites are built using responsive designs. The layout is determined by the resolution and the device that the site is being viewed on. So here are some helpful links that got me up to speed with all this newfangled HTML and CSS and Javascript and what have you:

Web Field Manual
This is a link to a collection of more links! A lot of the stuff here was pretty useful for getting set up with a new work flow, and to catch up on recent trends in web design. Separated by category, I think I looked through almost every link they offered.

Flat Icon
About a billion of free to use icons (as long as you attribute the source) for any sort of design needs.

Responsive Workflow
A good article discussing the changes in the web development work flow from back in the old days of PSD mock ups to the new way of prototyping directly in HTML, CSS, and Javascript.

HTML5 Templates
Useful for taking a look at various styles that are designed with responsiveness in mind. See how various templates respond to various mobile device resolutions.

Responsive Grid System
A pretty nifty responsive grid framework to use when developing a responsive site.

Unsemantic
Another nifty grid system for responsive design. I used this for the Otter website.

Font Squirrel
This is blowing my mind but apparently fonts can just be straight up embedded now in modern browsers. No more need for crazy flash javascript canvas hacks to render text of any font.

Unsplash
A collection of high resolution totally free to use stock photos, and it's updated frequently.

Web Creme
Pretty straight forward inspiration gallery of recent cool and/or hip websites. Some of these are a little bit too trendy but there's a lot of good stuff here to check out.

Dev Log: Shader Follow Up

Dev Log: Shader Follow Up
My last post went over some of my recent shader developments with displacement maps, and using gradient maps to recolor portions of the screen. I had a couple of questions of what exactly was going on behind the scenes with the render textures that I was using to tell the shader how to actually manipulate the image, so I thought I would address that now!

Here's an example image from the game with a lot of explosions going on:

Image


Each explosion has a shockwave ripple coming out of it which distorts the area around it. The explosion also changes the color of the screen around to a gradient map with pink and yellow. This makes it look like an intense heat, or something.

For reference, here's the shader again (it's been slightly modified since yesterday.)
uniform sampler2D texture;
uniform sampler2D displacementMap;
uniform sampler2D paletteMap;
uniform sampler2D gradientMap;

void main() {
// Get the pixels off of the maps.
vec4 displacementPixel = texture2D(displacementMap, gl_TexCoord[0]);
vec4 palettePixel = texture2D(paletteMap, gl_TexCoord[0]);

// Read the pixel from the displaced position.
vec2 pos = gl_TexCoord[0];
pos.x += (displacementPixel.r * 2.0 - 1.0) * 0.025;
pos.y -= (displacementPixel.g * 2.0 - 1.0) * 0.025;

// Get the displaced pixel.
vec4 pixel = texture2D(texture, pos);

// Proper grayscale conversion.
float gray = dot(pixel.rgb, vec3(0.299, 0.587, 0.114));

// Get the color from the gradient.
float gradientPos = mod(gray + palettePixel.g, 1);

// Get the actual color from the gradient.
vec4 gradientMapPixel = texture2D(gradientMap, new vec2(gradientPos, palettePixel.r));

// Mix the gradient with the pixel color based on the palette pixel.
pixel = mix(pixel, gradientMapPixel, palettePixel.a);

// Apply the final color multiplied by the gl color.
gl_FragColor = pixel * gl_Color;
}
From this point on there's going to be a lot of images and some hefty animated gifs, so I'll hide the rest of this post behind the read more button!

Dev Log: Shaders All Day

Dev Log: Shaders All Day
I've been taking an extended vacation in shader town lately, and so far I've been having a lot of fun! One of the things I was figuring out was how to take an image and remap all the colors to a gradient based on their luminosity (well, a sloppy way of estimating the luminosity.) This seems like a pretty powerful effect that could be used to really spice up effects. Yeah, I'm always thinking about how to make explosions better.

First I'll share the actual shader code that I'm working with right now. This is the shader that's being used for all of my full screen effects.
uniform sampler2D texture;
uniform sampler2D displacementMap;
uniform sampler2D paletteMap;
uniform sampler2D gradientMap;

void main() {
vec4 displacementPixel = texture2D(displacementMap, gl_TexCoord[0]);
vec4 palettePixel = texture2D(paletteMap, gl_TexCoord[0]);

vec2 pos = gl_TexCoord[0];
pos.x += (displacementPixel.r * 2.0 - 1.0) * 0.025 * displacementPixel.a;
pos.y -= (displacementPixel.g * 2.0 - 1.0) * 0.025 * displacementPixel.a;

// Get the displaced pixel.
vec4 pixel = texture2D(texture, pos);

// Proper grayscale conversion.
float gray = dot(pixel.rgb, vec3(0.299, 0.587, 0.114));

// Get the color from the gradient.
float gradientPos = mod(gray + palettePixel.g, 1);

vec4 gradientMapPixel = texture2D(gradientMap, new vec2(gradientPos, palettePixel.r));

// Mix the gradient with the pixel color based on the palette pixel.
pixel = mix(pixel, gradientMapPixel, palettePixel.a);

gl_FragColor = pixel * gl_Color;
}
Using Otter I can just apply this shader to the game's main Surface object and I'm ready to roll with special effects. This post is going to be image heavy, so I'll hide the rest of it behind the jump!