


Dev Log: Color Grading Shader
I love post processing shaders! I think they're one of my favorite things to mess with now that I have a cool C# game making framework to play around with. One of my latest experiments was implementing color grading into Stratoforce, and by extension all of my future games built with Otter.
What's color grading? Basically you have a texture that contains every single color possible on it. This texture is usually referred to as a Look Up Table, or LUT. When your texture, or your game, or whatever goes to render itself, the shader can remap all of its colors to the colors on the LUT texture.
Check out these links for more details:
* Unreal Engine Color Grading
* Simple Color Grading for Games
* Color Grading: Another cool rendering trick
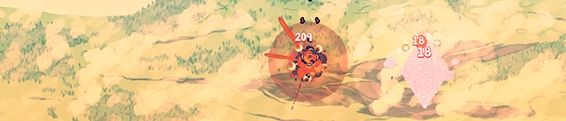
So here's what Stratoforce looks like with a normal color table:
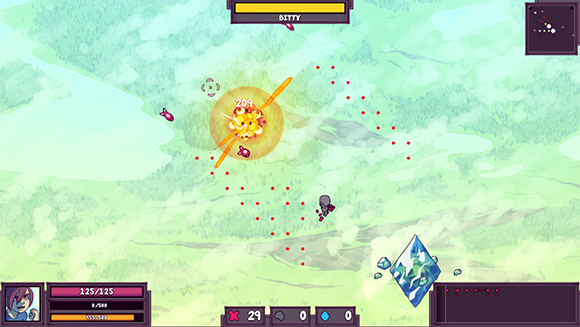
And here's a quick test on color grading:
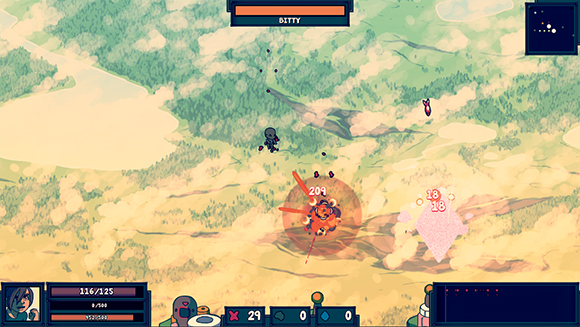
Whoa look at how different all the colors are! The effect is really powerful as it allows you to apply any sort of color corrections to the whole game in real time.
Here is my work flow for creating a color table and using it to alter the colors of the game:
* I downloaded a standard LUT texture from Epic: RGBTable16x1.png
* I took a screenshot of my game with the RGBTable superimposed on the top left corner of the screen.
* I brought the screenshot into Photoshop and played around with some adjustment layers: Hue/Saturation, Color Balance, Curves, etc.
* I then copy merged the RGBTable image from that document and exported it as a new png file.
* I used that png file as the LUT table for the color correction in the shader.
So the standard RGB table looks like this:

And the modified version from the Photoshop file comes out looking like this:

Now the LUT texture gets loaded into a shader as a 3d texture. Whoa a 3d texture! I didn't even know that a 3d texture could exist until yesterday. Basically imagine a cube that is composed of every color possible. The x y z of the cube is actually r g b! That's why the look up table texture looks like a series of squares. Notice how its 16 x 16 x 16 pixels. Crazy, right?
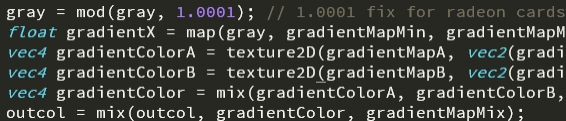
So here's what I had to do for my GLSL shader in Otter:
Since SFML by default only binds textures as 2D textures in OpenGL, I had to find a work around for loading a 2d texture as a 3d one. I found a work around here and used it in my shader.
It seems like the real magic is using this dynamically in a game. Interpolating between various LUT textures for different effects seems like it could be really interesting! I'm excited to play around with this kind of stuff more while procrastinating on solving the hard problems of working on this game.
What's color grading? Basically you have a texture that contains every single color possible on it. This texture is usually referred to as a Look Up Table, or LUT. When your texture, or your game, or whatever goes to render itself, the shader can remap all of its colors to the colors on the LUT texture.
Check out these links for more details:
* Unreal Engine Color Grading
* Simple Color Grading for Games
* Color Grading: Another cool rendering trick
So here's what Stratoforce looks like with a normal color table:
And here's a quick test on color grading:
Whoa look at how different all the colors are! The effect is really powerful as it allows you to apply any sort of color corrections to the whole game in real time.
Here is my work flow for creating a color table and using it to alter the colors of the game:
* I downloaded a standard LUT texture from Epic: RGBTable16x1.png
* I took a screenshot of my game with the RGBTable superimposed on the top left corner of the screen.
* I brought the screenshot into Photoshop and played around with some adjustment layers: Hue/Saturation, Color Balance, Curves, etc.
* I then copy merged the RGBTable image from that document and exported it as a new png file.
* I used that png file as the LUT table for the color correction in the shader.
So the standard RGB table looks like this:
And the modified version from the Photoshop file comes out looking like this:
Now the LUT texture gets loaded into a shader as a 3d texture. Whoa a 3d texture! I didn't even know that a 3d texture could exist until yesterday. Basically imagine a cube that is composed of every color possible. The x y z of the cube is actually r g b! That's why the look up table texture looks like a series of squares. Notice how its 16 x 16 x 16 pixels. Crazy, right?
So here's what I had to do for my GLSL shader in Otter:
// Apply the color grading

//pixel is input color, colorGrade is sampler2D of LUT.

vec4 gradedPixel = sampleAs3DTexture(colorGrade, pixel.rgb, 16);

gradedPixel.a = pixel.a;

pixel = gradedPixel;
Since SFML by default only binds textures as 2D textures in OpenGL, I had to find a work around for loading a 2d texture as a 3d one. I found a work around here and used it in my shader.
vec4 sampleAs3DTexture(sampler2D texture, vec3 uv, float width) {

	float sliceSize	= 1.0 / width;				// space of 1 slice

	float slicePixelSize = sliceSize / width;			// space of 1 pixel

	float sliceInnerSize = slicePixelSize * (width - 1.0);	// space of width pixels

	float zSlice0 = min(floor(uv.z * width), width - 1.0);

	float zSlice1 = min(zSlice0 + 1.0, width - 1.0);

	float xOffset = slicePixelSize * 0.5 + uv.x * sliceInnerSize;

	float s0 = xOffset + (zSlice0 * sliceSize);

	float s1 = xOffset + (zSlice1 * sliceSize);

	vec4 slice0Color = texture2D(texture, vec2(s0, uv.y));

	vec4 slice1Color = texture2D(texture, vec2(s1, uv.y));

	float zOffset = mod(uv.z * width, 1.0);

	vec4 result	= mix(slice0Color, slice1Color, zOffset);

	return result;

}
It seems like the real magic is using this dynamically in a game. Interpolating between various LUT textures for different effects seems like it could be really interesting! I'm excited to play around with this kind of stuff more while procrastinating on solving the hard problems of working on this game.


Comments
Wouldn't it be much faster(runtime) and more flexible if you just implemented the photoshop effects you need as a glsl function?
Sometimes i'm so damn jealous of you 2d-game guys. You can pull off stuff like that without wasting a thought on performance... :(
http://the-witness.net/news/2012/08/fun-with-in-engine-color-grading/
DO NOT WASTE MILLIONS OF GPU CYCLE inside a shader...
Once per frame is only 16x16x16x4 byte to process. And if you think you need the performance bit, a blending done in SSE is taking really no time for 4096 RGBA items.
float4 sampleAs3DTexture(float3 uv, float width) {
float innerWidth = width - 1.0;
float sliceSize = 1.0 / width; // space of 1 slice
float slicePixelSize = sliceSize / width; // space of 1 pixel
float sliceInnerSize = slicePixelSize * innerWidth; // space of width pixels
float zSlice0 = min(floor(uv.z * innerWidth), innerWidth);
float zSlice1 = min(zSlice0 + 1.0, innerWidth);
float xOffset = slicePixelSize * 0.5 + uv.x * sliceInnerSize;
float s0 = xOffset + (zSlice0 * sliceSize);
float s1 = xOffset + (zSlice1 * sliceSize);
float yPixelSize = sliceSize;
float yOffset = yPixelSize * 0.5 + uv.y * (1.0 - yPixelSize);
float4 slice0Color = txRGBTable.SampleLevel(samLinear, float2(s0, yOffset), 0.0);
float4 slice1Color = txRGBTable.SampleLevel(samLinear, float2(s1, yOffset), 0.0);
float zOffset = frac(uv.z * innerWidth);
float4 result = lerp(slice0Color, slice1Color, zOffset);
return result;
}
Post your comment!