


FlashDevelop to iPad Workflow

I recently got one of them new fangled iPad things and I heard on the internet that Adobe AIR is actually pretty decent at building things for iOS. Offspring Fling used Adobe AIR so I'm already a little familiar with how to build for Windows and Mac, but it turns out that iOS is an entirely different beast... sort of. The set up and configuration of the whole workflow can be a nightmare, but once it's over then you'll have a set up that lets you push F5 to build right to your device!
Follow along on this series of text and images and hopefully you will be enjoying pushing the F5 key on your keyboard and seeing an app pop up on your iOS device! Also put on some relaxing music because some parts of this tutorial might be hard to understand and frustrating. I'm using Windows 7 64-bit for this.
Before we get started you should know that there is a $99 a year (more like $108 with taxes) cost to developing for any apple devices. Before you can even run your software on any sort of iPad, iPhone, iPodTouch, or whatever, you'll need to be a registered Apple developer. (Or you can jailbreak your device, but I don't know anything about that.)
To become an Apple developer, go to the developer registration page and either create a new Apple ID, or sign in with your existing Apple ID. I had a problem where for some reason I couldn't use my Apple ID that I had registered back in 2008, so I had to create a new one. Just go through the steps that include accepting their agreement, paying the money, and activating your account via email. You'll eventually get an Activation Code that you'll use to activate your account as a developer.
Be warned that registering as a company for some reason takes a lot longer than just an individual, so if you're planning on registering a company as a developer you might have to wait a little while to get approved. My personal application to become a developer was approved almost instantly.
Also make sure to follow the steps for iOS development. There are also options to become a developer for the Mac App Store, but I believe that costs an additional $99 per year.
Now here comes the most frustrating and dumbest part (for me, at least.) You're going to need to go through this process of creating a bunch of certificates and uploading files and downloading new certificates that you created with the other certificates and ultimately you want to end up with a p12 file, and a mobileprovision file. FlashDevelop will eventually use these two things to build an app and send it to your device.
Log into your developer account at the Apple developer site. Go the iOS Dev Center, and then all the way on the right there's a link to Certificates, Identifiers, and Profiles. On the left side there's a column labeled iOS Apps. Click on Certificates and we'll be almost ready to create our first certificate.
You're now presented with an empty list of certificates. On the top right there's a plus button that you need to press to add a new certificate. When you click that there's a new list of options ready to go. For now just choose iOS App Development and then click the continue button on the bottom of the page.
Now you should be faced with a page that's talking about creating a Certificate Signing Request.
The page talks about using your mac to do this, but we don't need no stinkin' macs. What we need for Windows is a little piece of software called OpenSSL. I just downloaded this version and it seems to work just fine. Install OpenSSL on your machine and get ready for some command line action.
OpenSSL is going to generate the CSR file for us that the Apple developer portal desires. I set up some bat files for myself to do some of the OpenSSL magic required.
csr.bat
Note the top line of this bat file. Make sure it's the correct path to your OpenSSL bin folder. If you installed the default location in Windows you shouldn't have to change it.
Pro tip: if you hold down Shift and right click in a folder, you get a new option Open command window here. This is incredibly useful for this kinda stuff.
Make sure you change the info in the -subj line to your info. Execute the bat file and you should end up with a file CertificateSigningRequest.certSigningRequest that you can now upload to Apple.
Back on that page that is talking about creating a CSR file, you can now click Continue. The next page is going to ask you to choose a file on your computer and upload it. Choose the CertificateSigningRequest.certSigningRequest file that was just generated and upload it.
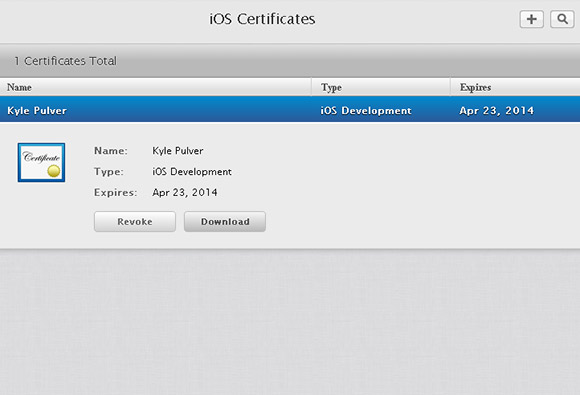
If everything went well, you should now end up with a developer certificate with your name on it showing up on this list.
The next step is going to require iTunes installed. You probably already have iTunes installed at this point since you're working with some sort of Apple device.
Connect your iPad (or whatever) to your PC and navigate to the device on iTunes. It should pop up on the upper right corner of the iTunes window. In the Summary tab you'll see a little space that shows the Capacity and Serial Number of your device. Left click on Serial Number and it should change into Identifier (UDID). We're going to need that long string of numbers and letters for the next step, so keep iTunes open as you head back to the Apple developer portal thing.
Navigate to the Devices section of the Certificates, Identifiers, and Profiles page that we're currently using. Once again on the upper right, click the plus button to add a new device.
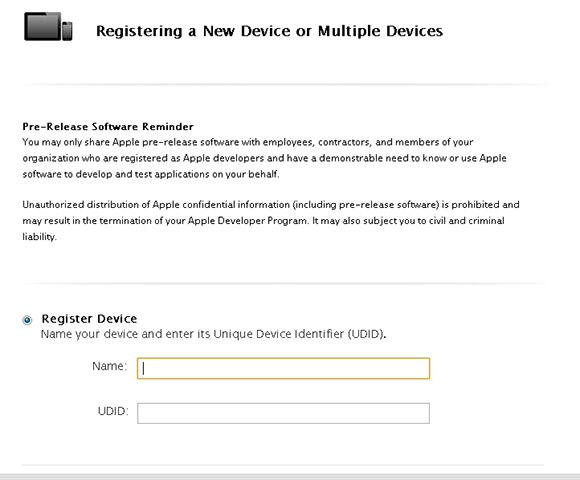
All that is required here is a name and a UDID. Back in the iTunes window you can right click the UDID of your device and copy it to your clipboard. Paste it into the UDID field on the page, and name your device. I kept the same name for my iPad which was "Kyle's iPad."
How's it going? Are you doing alright? I hope you're not too confused. This next part shouldn't be too bad.
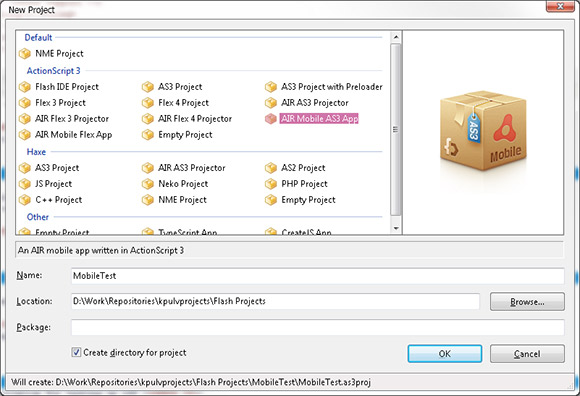
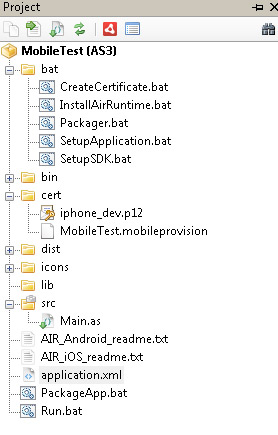
Now open up FlashDevelop and create a new project. This is just going to be a throw away test project for the sake of getting something running on your device. Select the AIR Mobile AS3 App option and click OK.
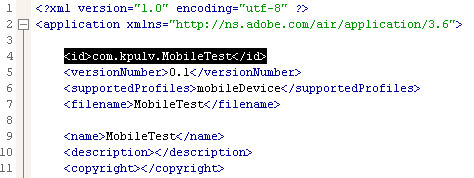
FlashDevelop will then do its magic and create a whole bunch of super useful files for you to use. The particular file that you want to look at right now is application.xml. You're going to need the id of your app which should be located on line 4 of the xml file. In my case I changed the id to "com.kpulv.MobileTest" as this is the recommended format from Apple. This id is going to have to match our mobile provisioning file in the next step.
Now that you have a project started in FlashDevelop you'll need to create an App ID for it. This is where the id from your application.xml file will come into play. Go to the App IDs section of the Certificates, Identifiers, and Profiles page.
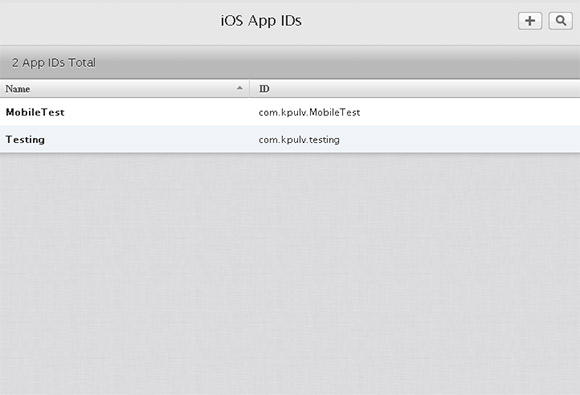
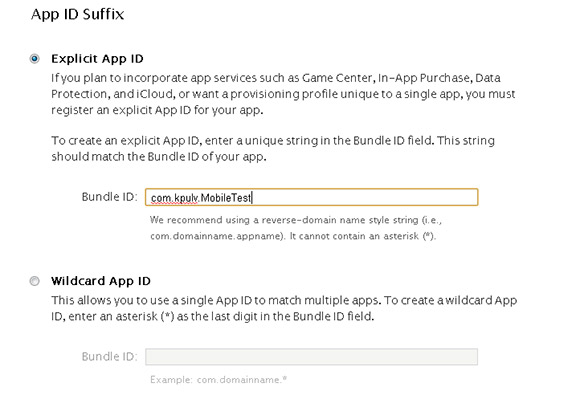
For my test project I used the id "com.kpulv.MobileTest" so for the Name field I used "MobileTest" and down below for the Bundle ID I used "com.kpulv.MobileTest" because as far as I can tell this Bundle ID needs to match your application id from application.xml.
All you should have to do here is click Continue and then Submit. Your App ID will be registered and should show up on this list.
Provisioning Profiles are some sort of magic files that are needed to let your in-development apps run on iOS devices. Something to do with Apple never letting apps be distributed outside of the app store, or something.
In order to test just your super simple blank project that you just made in FlashDevelop, you'll need a provisioning profile for it. No problem though! Just go back to that Apple developer page and head to the Provisioning Profiles section. Add a new profile with the button on the top right.
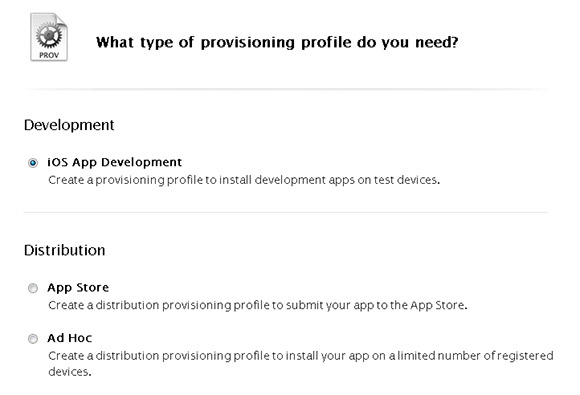
Choose iOS App Development and click continue. The next thing you should see is Select App ID. There will be a drop down menu of all of the Apps you have registered with IDs. For now the only thing you should have is the single App ID that you registered in the previous section. Click Continue.

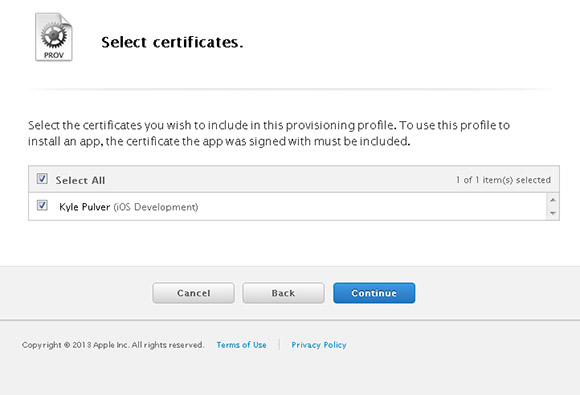
Now you need to select the certificates you want associated with this profile. Once again you should only have one option here, and that was the certificate we created in the earlier steps of this guide. Select it and click Continue.
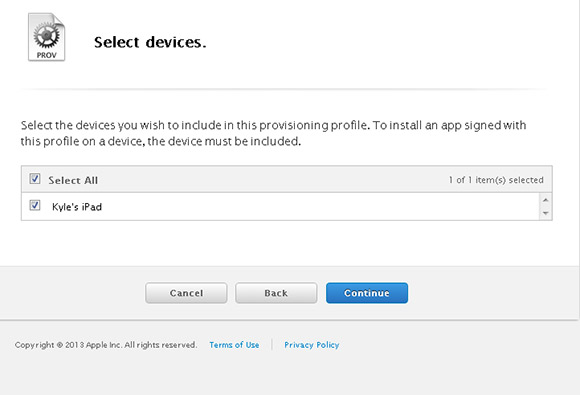
Now you're presented with the device options. Again you should only have one option and that's the single device you've registered. In my case this is "Kyle's iPad." Select your device and click Continue.
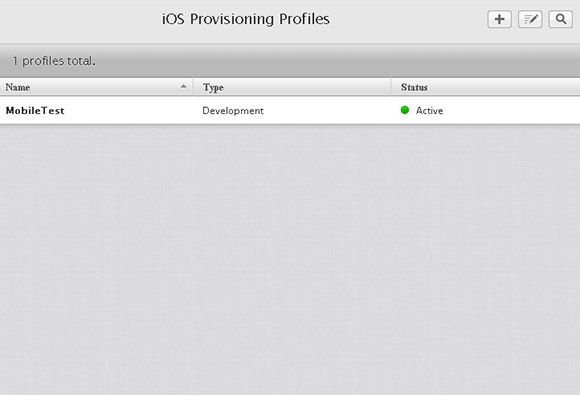
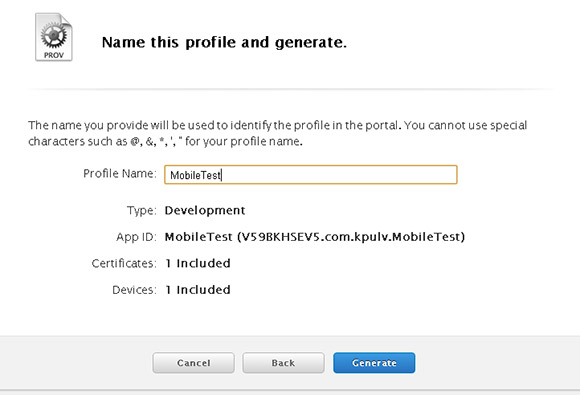
Now name your profile and click on Generate. The name can be whatever you want but it's probably useful to name it with something that makes sense. I just named mine MobileTest. After you generate it, you'll be able to now download the file.
Now that you have this file named something.mobileprovision you're going to do two things with it. First you're going to add to your device with iTunes, and then you're going to place a copy of it inside the FlashDevelop project.
Find your iTunes window again and make sure your device is plugged in and you're at the main screen in iTunes. This step wont work if you're actually inside of your device. The simplest way to add your mobileprovision file to your device is to simply drag the file into iTunes. If you're doing it correctly, you'll see a little blurb below the file as you drag it that says "Link" when it gets over the iTunes window. If you're doing it wrong, there will be a small red X with the file as you drag it. Make sure that you're not inside your device in iTunes if you're getting the red X.
This is a little confusing of a step because when you drag the file into iTunes absolutely nothing will happen. Nothing will appear different or changed, so just bear with me at this point. After you drag that file in, navigate to your device in iTunes and on the bottom right click the "Sync" button. Your provisioning profile should now be synced to the device.
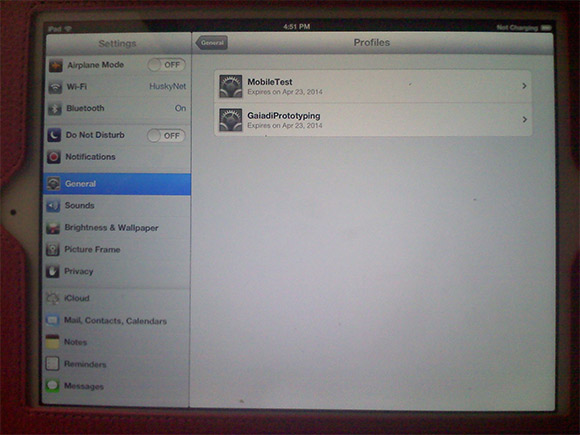
To double check that this worked you'll have to check on the device itself. Go to Settings and the General tab. Scroll down until you see Profiles and tap there. You should then see any profiles you've added to your device through iTunes.
Oh my God this is so stupidly long. Don't worry though once you do this once you'll be all set and doing it again will feel way easy! ... I hope!
The second thing you're going to do with the mobileprovision file is add to the cert folder in your FlashDevelop project. Just copy and paste it to that folder, that's all you need to do for now.
The last missing piece of the magical cert folder is the p12 file. This is where openSSL will come into play once again, as well as a cer file from Apple. Remember when you sent them the CSR file and they turned it into a certificate? You're going to need to download that certificate. On the Apple developer site go back to the Certificate List and click on the one you uploaded. Click Download and you should get a file named ios_development.cer.
One you have that, the other file you'll need is mykey.key. When you generated your certSigningRequest file you also generated a file named mykey.key (if you followed my bat file.) This file along with ios_development.cer will be used by OpenSSL to create the desired p12 file.

cer_to_p12.bat
Make sure you have your ios_development.cer and mykey.key file in the same folder, and open a command prompt in that folder and run the bat file. Also make sure to run your command prompt in Administrator mode for this step. You may run into errors in OpenSSL if you don't have sufficient privileges.
When you're prompted for a password, you can pick whatever you want. For the sake of testing stuff I just chose "poop" because I am a mature adult.
If everything went well, you should now have a iphone_dev.p12 file that can be placed into the cert folder of your FlashDevelop project.
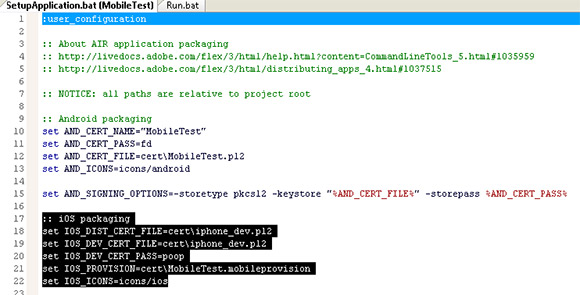
In your FlashDevelop project open up the SetupApplication.bat file in the bat folder. In the iOS packaging section there are some things you'll need to set up. Your IOS_DIST_CERT_FILE should be set to cert\iphone_dev.p12, and your IOS_DEV_CERT_FILE should also be set to cert\iphone_dev.p12. The IOS_DEV_CERT_PASS should be the password you used to create the p12 file. In my case the password is poop. The IOS_PROVISION should be set to your mobileprovision file. In my case it was cert\MobileTest.mobileprovision.
When you compile and run your app on your device you can actually use the FlashDevelop debugger to see trace statements. In order to do this you'll need to supply the IP address of the computer running the debugger in your SetupApplication.bat file.
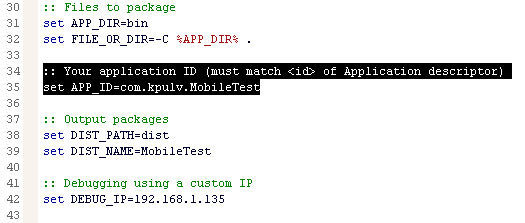
First find your local IP address by opening up a command prompt window and typing ipconfig. Under the first set of information you should see a line that reads IPv4 Address followed by a number that begins with 192.168. Take that number (in my case it is 192.168.1.135) and put it into your SetupApplication.bat file on line 42 immediately after the set DEBUG_IP=. So for me that line reads set DEBUG_IP=192.168.1.135. The app will now connect to the debugger running on my local computer at that IP address. Pretty neato!
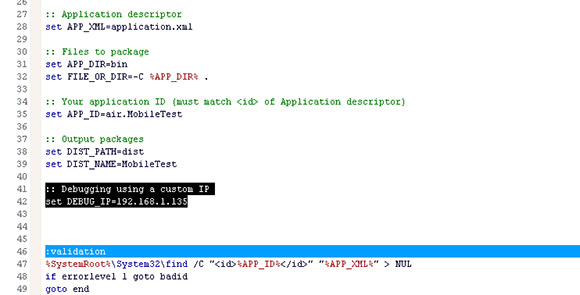
While you're in your SetupApplication.bat file, you should also make sure your APP_ID on line 35 matches the id in your application.xml.
After all of that... you're finally ready to build to the device. There's just one more tiny thing you have to do in FlashDevelop before you push F5. In the Run.bat file you'll see on line 6 there is a section called target. Comment out the goto desktop line with two colons, and uncomment the line that reads goto ios-debug (should be line 11.)

Now is the time! Make sure that your device is connected and push F5 to see the magic happen. Building an ipa file and sending it to the device might actually take a few minutes, so don't be alarmed if your build window looks like it's doing nothing for a little while.
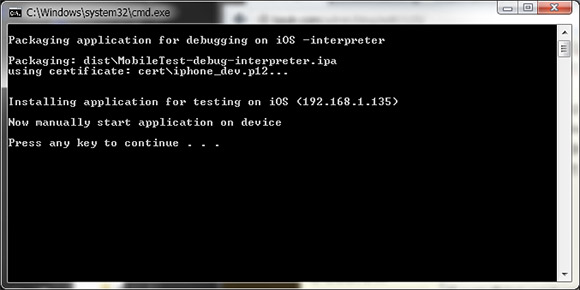
If everything went well you should see a prompt that tells you to manually start the application on the device. If you hop onto your device you should see an app on there with an Adobe AIR icon. Launch it and you should get just a blank white screen. Push the home button to quit.

You have a thing running on your iOS device now! And whenever you push F5 in FlashDevelop, it builds it and sends it right to the app. How awesome is that? Now you can go crazy and start actually making things.
Untold Entertainment: Flash to iOS Step By Step
Andy Moore: How to make iOS/Android games on a PC
Connor Ullmann: Air 2.6 and iOS
Adobe AIR iOS Certifcates
If you're running into errors about the app being unable to install, make sure that the id of your application in the application.xml file matches the Bundle ID of your app in the Apple developer website.
Sometimes the build process will just crap out for no good reason. For me, one out of every 20 builds or so just has an error, and I don't know why. This isn't a big deal though because when I try building again it magically will work. I think it has something to do with making too many builds very quickly (like under 60 seconds between builds.)
If you're having troubles then I can try to help/fix the tutorial. Just let me know in the comments!
Follow along on this series of text and images and hopefully you will be enjoying pushing the F5 key on your keyboard and seeing an app pop up on your iOS device! Also put on some relaxing music because some parts of this tutorial might be hard to understand and frustrating. I'm using Windows 7 64-bit for this.
Become an Apple Developer
Before we get started you should know that there is a $99 a year (more like $108 with taxes) cost to developing for any apple devices. Before you can even run your software on any sort of iPad, iPhone, iPodTouch, or whatever, you'll need to be a registered Apple developer. (Or you can jailbreak your device, but I don't know anything about that.)
To become an Apple developer, go to the developer registration page and either create a new Apple ID, or sign in with your existing Apple ID. I had a problem where for some reason I couldn't use my Apple ID that I had registered back in 2008, so I had to create a new one. Just go through the steps that include accepting their agreement, paying the money, and activating your account via email. You'll eventually get an Activation Code that you'll use to activate your account as a developer.
Be warned that registering as a company for some reason takes a lot longer than just an individual, so if you're planning on registering a company as a developer you might have to wait a little while to get approved. My personal application to become a developer was approved almost instantly.
Also make sure to follow the steps for iOS development. There are also options to become a developer for the Mac App Store, but I believe that costs an additional $99 per year.
Certificates Certificates Certificates
Now here comes the most frustrating and dumbest part (for me, at least.) You're going to need to go through this process of creating a bunch of certificates and uploading files and downloading new certificates that you created with the other certificates and ultimately you want to end up with a p12 file, and a mobileprovision file. FlashDevelop will eventually use these two things to build an app and send it to your device.
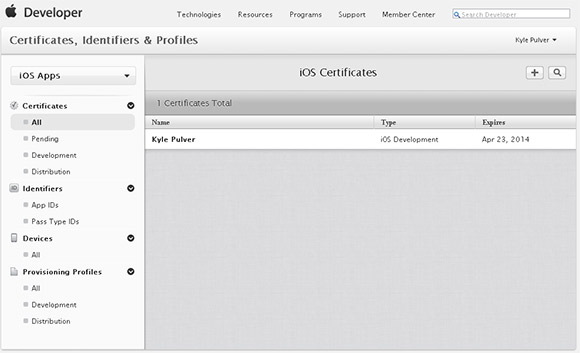
Log into your developer account at the Apple developer site. Go the iOS Dev Center, and then all the way on the right there's a link to Certificates, Identifiers, and Profiles. On the left side there's a column labeled iOS Apps. Click on Certificates and we'll be almost ready to create our first certificate.
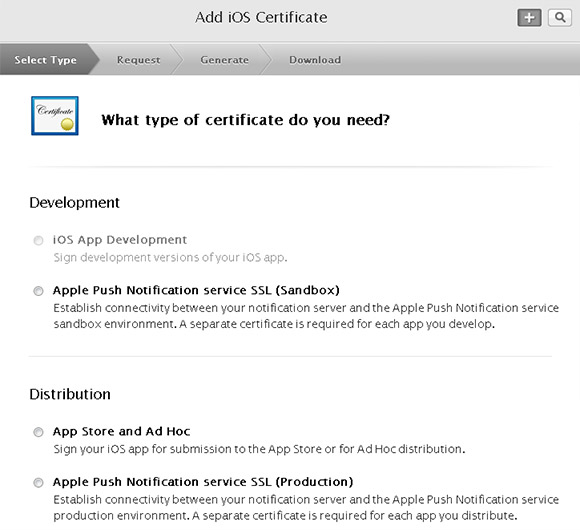
You're now presented with an empty list of certificates. On the top right there's a plus button that you need to press to add a new certificate. When you click that there's a new list of options ready to go. For now just choose iOS App Development and then click the continue button on the bottom of the page.
Creating a CSR File
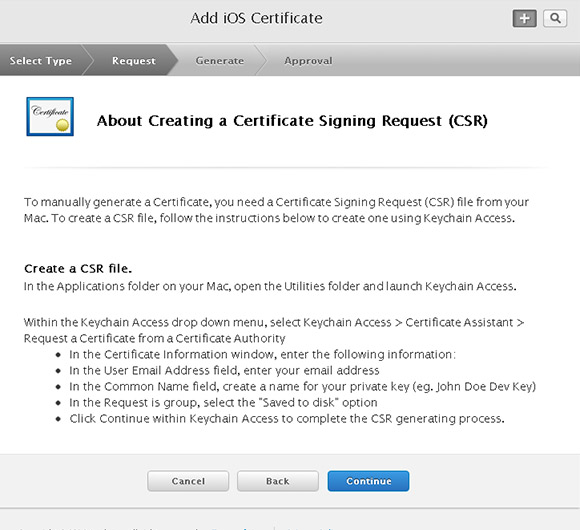
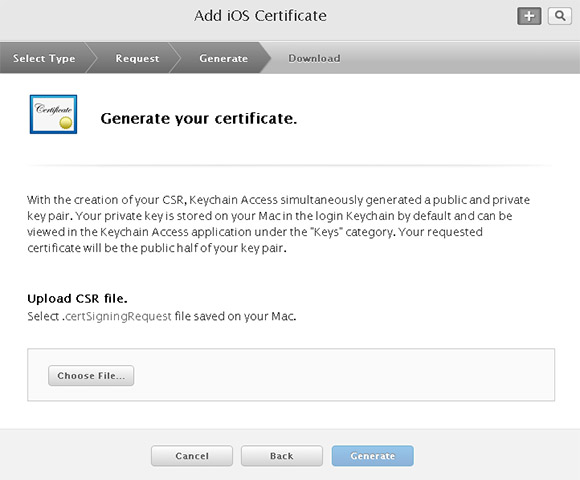
Now you should be faced with a page that's talking about creating a Certificate Signing Request.
The page talks about using your mac to do this, but we don't need no stinkin' macs. What we need for Windows is a little piece of software called OpenSSL. I just downloaded this version and it seems to work just fine. Install OpenSSL on your machine and get ready for some command line action.
OpenSSL is going to generate the CSR file for us that the Apple developer portal desires. I set up some bat files for myself to do some of the OpenSSL magic required.
csr.bat
path %PATH%;C:\OpenSSL-Win32\bin

openssl genrsa -out mykey.key 2048

openssl req -new -key mykey.key -out CertificateSigningRequest.certSigningRequest -subj "/emailAddress=youremail@yourdomain.com, CN=Your Name, C=US"
Note the top line of this bat file. Make sure it's the correct path to your OpenSSL bin folder. If you installed the default location in Windows you shouldn't have to change it.
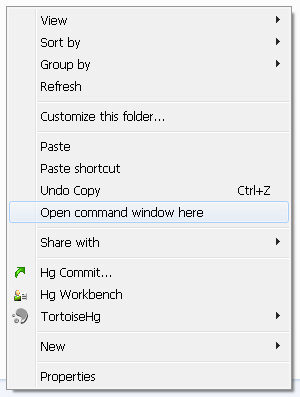
Pro tip: if you hold down Shift and right click in a folder, you get a new option Open command window here. This is incredibly useful for this kinda stuff.
Make sure you change the info in the -subj line to your info. Execute the bat file and you should end up with a file CertificateSigningRequest.certSigningRequest that you can now upload to Apple.
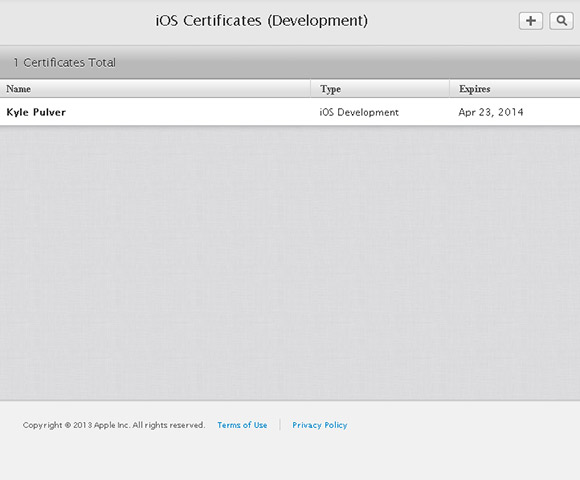
Back on that page that is talking about creating a CSR file, you can now click Continue. The next page is going to ask you to choose a file on your computer and upload it. Choose the CertificateSigningRequest.certSigningRequest file that was just generated and upload it.
If everything went well, you should now end up with a developer certificate with your name on it showing up on this list.
Register Your Device
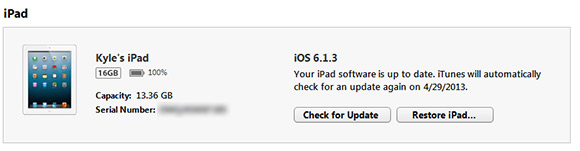
The next step is going to require iTunes installed. You probably already have iTunes installed at this point since you're working with some sort of Apple device.
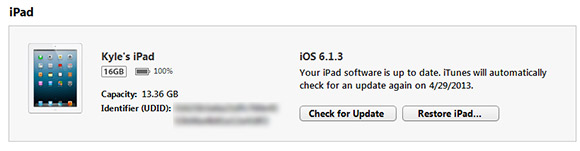
Connect your iPad (or whatever) to your PC and navigate to the device on iTunes. It should pop up on the upper right corner of the iTunes window. In the Summary tab you'll see a little space that shows the Capacity and Serial Number of your device. Left click on Serial Number and it should change into Identifier (UDID). We're going to need that long string of numbers and letters for the next step, so keep iTunes open as you head back to the Apple developer portal thing.
Navigate to the Devices section of the Certificates, Identifiers, and Profiles page that we're currently using. Once again on the upper right, click the plus button to add a new device.
All that is required here is a name and a UDID. Back in the iTunes window you can right click the UDID of your device and copy it to your clipboard. Paste it into the UDID field on the page, and name your device. I kept the same name for my iPad which was "Kyle's iPad."
Create a Mobile AIR Project
How's it going? Are you doing alright? I hope you're not too confused. This next part shouldn't be too bad.
Now open up FlashDevelop and create a new project. This is just going to be a throw away test project for the sake of getting something running on your device. Select the AIR Mobile AS3 App option and click OK.
FlashDevelop will then do its magic and create a whole bunch of super useful files for you to use. The particular file that you want to look at right now is application.xml. You're going to need the id of your app which should be located on line 4 of the xml file. In my case I changed the id to "com.kpulv.MobileTest" as this is the recommended format from Apple. This id is going to have to match our mobile provisioning file in the next step.
Registering an App ID
Now that you have a project started in FlashDevelop you'll need to create an App ID for it. This is where the id from your application.xml file will come into play. Go to the App IDs section of the Certificates, Identifiers, and Profiles page.
For my test project I used the id "com.kpulv.MobileTest" so for the Name field I used "MobileTest" and down below for the Bundle ID I used "com.kpulv.MobileTest" because as far as I can tell this Bundle ID needs to match your application id from application.xml.
All you should have to do here is click Continue and then Submit. Your App ID will be registered and should show up on this list.
Provisioning Profiles
Provisioning Profiles are some sort of magic files that are needed to let your in-development apps run on iOS devices. Something to do with Apple never letting apps be distributed outside of the app store, or something.
In order to test just your super simple blank project that you just made in FlashDevelop, you'll need a provisioning profile for it. No problem though! Just go back to that Apple developer page and head to the Provisioning Profiles section. Add a new profile with the button on the top right.
Choose iOS App Development and click continue. The next thing you should see is Select App ID. There will be a drop down menu of all of the Apps you have registered with IDs. For now the only thing you should have is the single App ID that you registered in the previous section. Click Continue.
Now you need to select the certificates you want associated with this profile. Once again you should only have one option here, and that was the certificate we created in the earlier steps of this guide. Select it and click Continue.
Now you're presented with the device options. Again you should only have one option and that's the single device you've registered. In my case this is "Kyle's iPad." Select your device and click Continue.
Now name your profile and click on Generate. The name can be whatever you want but it's probably useful to name it with something that makes sense. I just named mine MobileTest. After you generate it, you'll be able to now download the file.
Profile to Device
Now that you have this file named something.mobileprovision you're going to do two things with it. First you're going to add to your device with iTunes, and then you're going to place a copy of it inside the FlashDevelop project.
Find your iTunes window again and make sure your device is plugged in and you're at the main screen in iTunes. This step wont work if you're actually inside of your device. The simplest way to add your mobileprovision file to your device is to simply drag the file into iTunes. If you're doing it correctly, you'll see a little blurb below the file as you drag it that says "Link" when it gets over the iTunes window. If you're doing it wrong, there will be a small red X with the file as you drag it. Make sure that you're not inside your device in iTunes if you're getting the red X.
This is a little confusing of a step because when you drag the file into iTunes absolutely nothing will happen. Nothing will appear different or changed, so just bear with me at this point. After you drag that file in, navigate to your device in iTunes and on the bottom right click the "Sync" button. Your provisioning profile should now be synced to the device.
To double check that this worked you'll have to check on the device itself. Go to Settings and the General tab. Scroll down until you see Profiles and tap there. You should then see any profiles you've added to your device through iTunes.
Oh my God this is so stupidly long. Don't worry though once you do this once you'll be all set and doing it again will feel way easy! ... I hope!
Generating a p12
The second thing you're going to do with the mobileprovision file is add to the cert folder in your FlashDevelop project. Just copy and paste it to that folder, that's all you need to do for now.
The last missing piece of the magical cert folder is the p12 file. This is where openSSL will come into play once again, as well as a cer file from Apple. Remember when you sent them the CSR file and they turned it into a certificate? You're going to need to download that certificate. On the Apple developer site go back to the Certificate List and click on the one you uploaded. Click Download and you should get a file named ios_development.cer.
One you have that, the other file you'll need is mykey.key. When you generated your certSigningRequest file you also generated a file named mykey.key (if you followed my bat file.) This file along with ios_development.cer will be used by OpenSSL to create the desired p12 file.
cer_to_p12.bat
path %PATH%;C:\OpenSSL-Win32\bin

openssl x509 -in ios_development.cer -inform DER -out ios_development.pem -outform PEM

set RANDOM=.rnd

openssl pkcs12 -export -inkey mykey.key -in ios_development.pem -out iphone_dev.p12
Make sure you have your ios_development.cer and mykey.key file in the same folder, and open a command prompt in that folder and run the bat file. Also make sure to run your command prompt in Administrator mode for this step. You may run into errors in OpenSSL if you don't have sufficient privileges.
When you're prompted for a password, you can pick whatever you want. For the sake of testing stuff I just chose "poop" because I am a mature adult.
If everything went well, you should now have a iphone_dev.p12 file that can be placed into the cert folder of your FlashDevelop project.
Configuring iOS Build Options
In your FlashDevelop project open up the SetupApplication.bat file in the bat folder. In the iOS packaging section there are some things you'll need to set up. Your IOS_DIST_CERT_FILE should be set to cert\iphone_dev.p12, and your IOS_DEV_CERT_FILE should also be set to cert\iphone_dev.p12. The IOS_DEV_CERT_PASS should be the password you used to create the p12 file. In my case the password is poop. The IOS_PROVISION should be set to your mobileprovision file. In my case it was cert\MobileTest.mobileprovision.
Remote Debugging
When you compile and run your app on your device you can actually use the FlashDevelop debugger to see trace statements. In order to do this you'll need to supply the IP address of the computer running the debugger in your SetupApplication.bat file.
First find your local IP address by opening up a command prompt window and typing ipconfig. Under the first set of information you should see a line that reads IPv4 Address followed by a number that begins with 192.168. Take that number (in my case it is 192.168.1.135) and put it into your SetupApplication.bat file on line 42 immediately after the set DEBUG_IP=. So for me that line reads set DEBUG_IP=192.168.1.135. The app will now connect to the debugger running on my local computer at that IP address. Pretty neato!
While you're in your SetupApplication.bat file, you should also make sure your APP_ID on line 35 matches the id in your application.xml.
Holy Crap Lets Build This Thing
After all of that... you're finally ready to build to the device. There's just one more tiny thing you have to do in FlashDevelop before you push F5. In the Run.bat file you'll see on line 6 there is a section called target. Comment out the goto desktop line with two colons, and uncomment the line that reads goto ios-debug (should be line 11.)
Now is the time! Make sure that your device is connected and push F5 to see the magic happen. Building an ipa file and sending it to the device might actually take a few minutes, so don't be alarmed if your build window looks like it's doing nothing for a little while.
Run the App!
If everything went well you should see a prompt that tells you to manually start the application on the device. If you hop onto your device you should see an app on there with an Adobe AIR icon. Launch it and you should get just a blank white screen. Push the home button to quit.
Now Go Crazy!
You have a thing running on your iOS device now! And whenever you push F5 in FlashDevelop, it builds it and sends it right to the app. How awesome is that? Now you can go crazy and start actually making things.
References
Untold Entertainment: Flash to iOS Step By Step
Andy Moore: How to make iOS/Android games on a PC
Connor Ullmann: Air 2.6 and iOS
Adobe AIR iOS Certifcates
Troubleshooting
If you're running into errors about the app being unable to install, make sure that the id of your application in the application.xml file matches the Bundle ID of your app in the Apple developer website.
Sometimes the build process will just crap out for no good reason. For me, one out of every 20 builds or so just has an error, and I don't know why. This isn't a big deal though because when I try building again it magically will work. I think it has something to do with making too many builds very quickly (like under 60 seconds between builds.)
If you're having troubles then I can try to help/fix the tutorial. Just let me know in the comments!


Comments
Plug the Device
Push f5
It took me more than 4 hours to make my blank project run on iOS.
It was like 5 minutes to run on the Android...
Any idea what I'm doing wrong?
set OPENSSL_CONF=C:\OpenSSL-Win32\bin\openssl.cfg
before the last part of your csr.bat file fixed the problem and allowed the certificate request to be generated
=)
On to the rest of the steps!
Unfortunately, it's not working the way I expect. I copied over a Flixel project that I was making with the iPad in mind and I'm still just getting a blank screen no matter what I do. Bleh.
This is very helpful when you just want to hit the play button and see the changes right away on your device instead of manually building, installing and running on device for each change!!!
Post your comment!