


Quick Digital Drawing Tutorial

Check out this quick digital art tutorial with this doodle yeah! This is a quick run through of my usual techniques that I try to squeeze the best looking image out of the shortest time possible with as little effort as possible because I just want to do a lot of drawings and not focus on one for too long.
Okay so first I'm using Clip Studio which is an amazing piece of software that sometimes you can totally grab for just $20 when it's on sale. I'm drawing on a Wacom Cintiq 22HD.
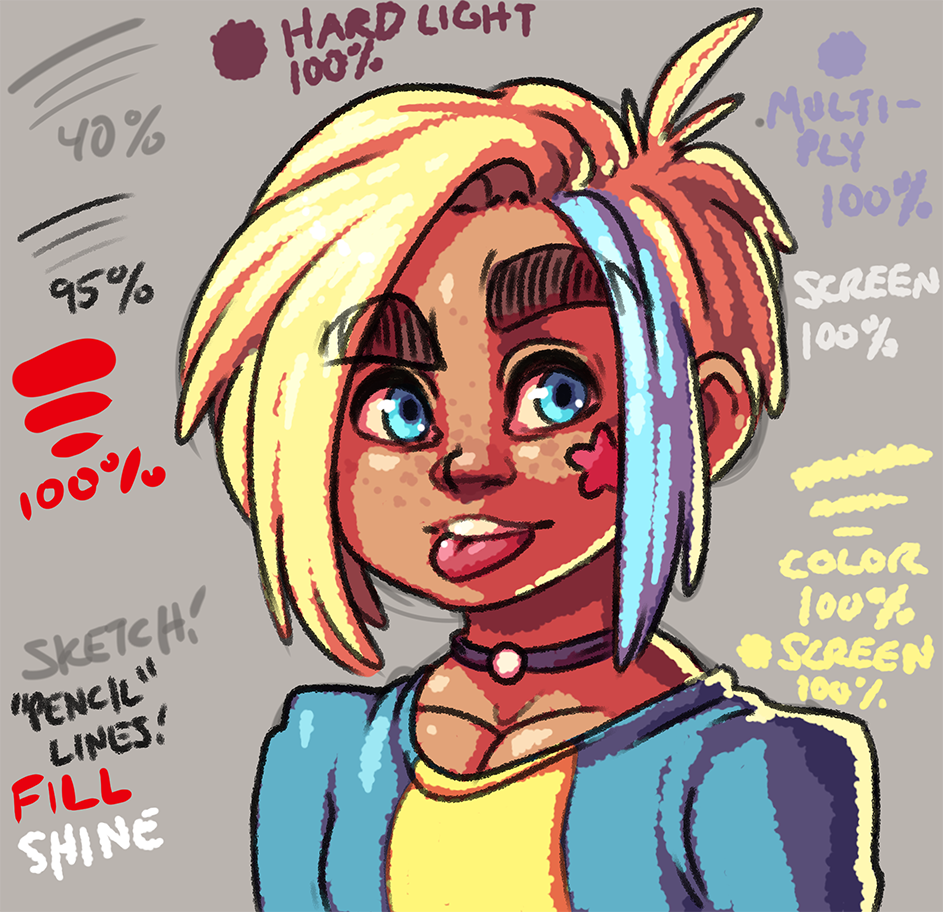
I always like to show what the final result is first:
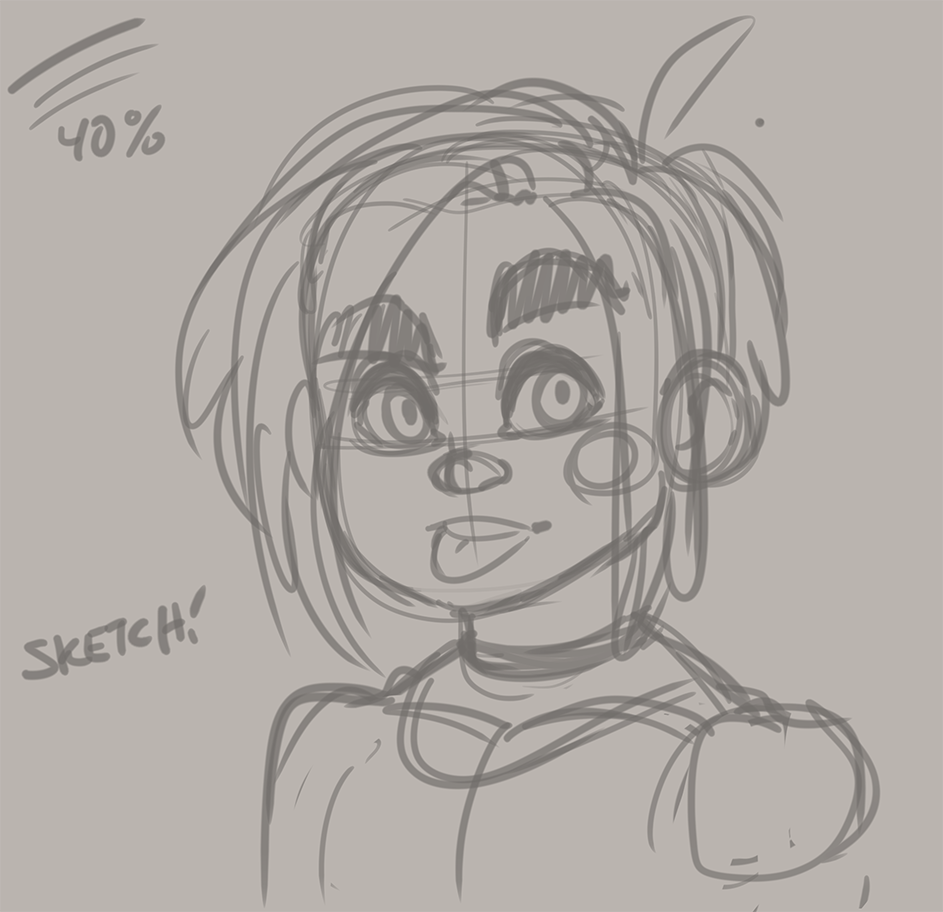
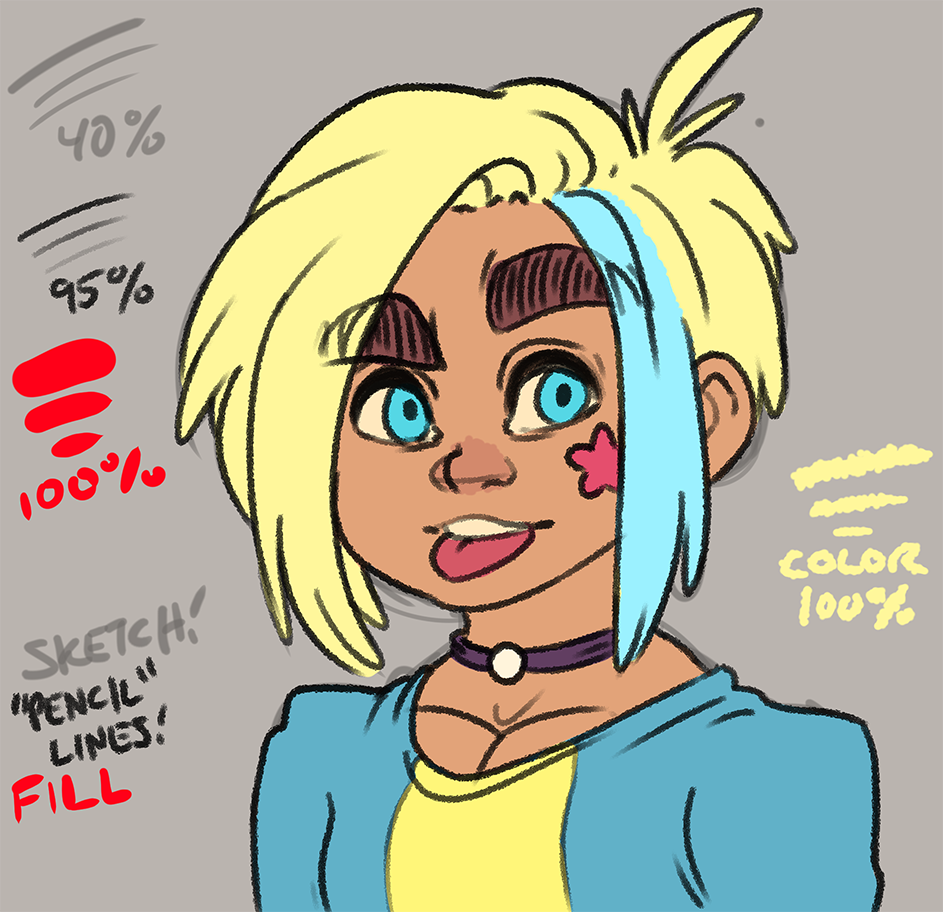
Okay! I start with a 30 pixel brush at 100 opacity with a hardness of 60, and a brush density of 80. I make a rough sketch on a layer of 40% opacity. I also usually make the canvas some sort of dull color instead of pure white since I find it way easier to draw, and color on a darker canvas. Also I usually work at double the resolution I plan to export the image as, so all of these images as examples are actually scaled down 50%!
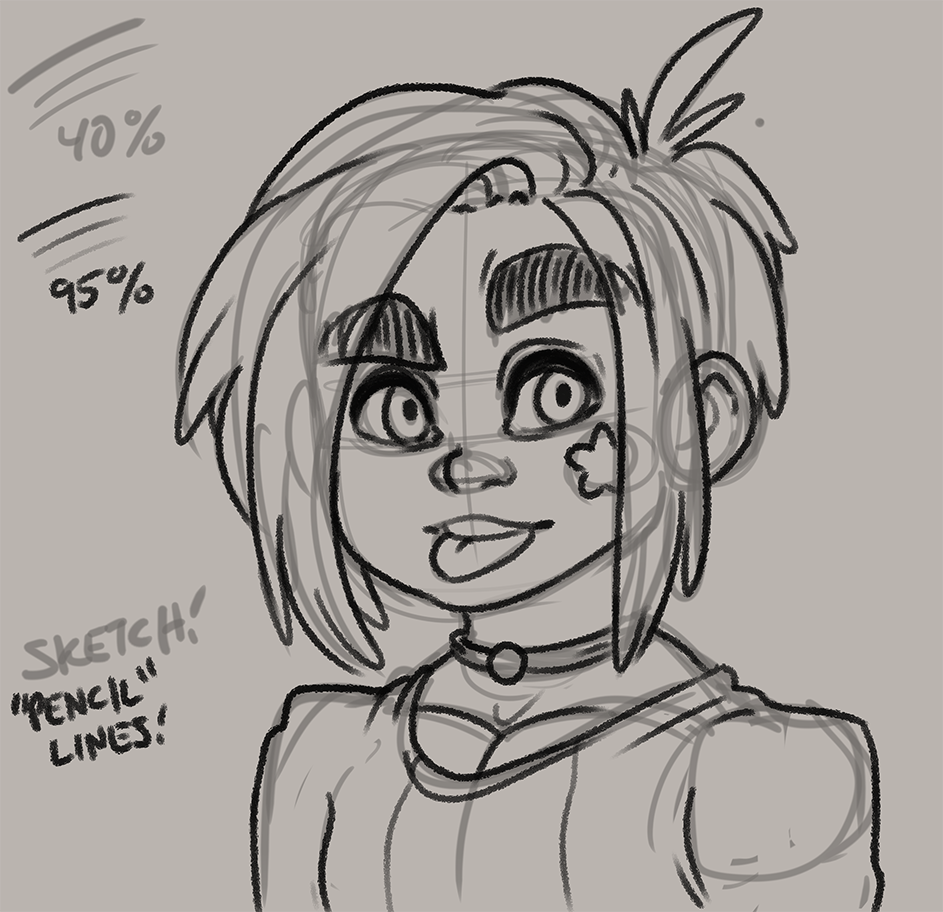
On top of the sketch layer I drop a new layer for the line work. I use a brush that has particles to make it seem like a pencil on paper. With a brush size of 20, hardness 60, particle size 9, particle density 6, and spray deviation of 50 I draw over the sketch on a layer set to 95% opacity.
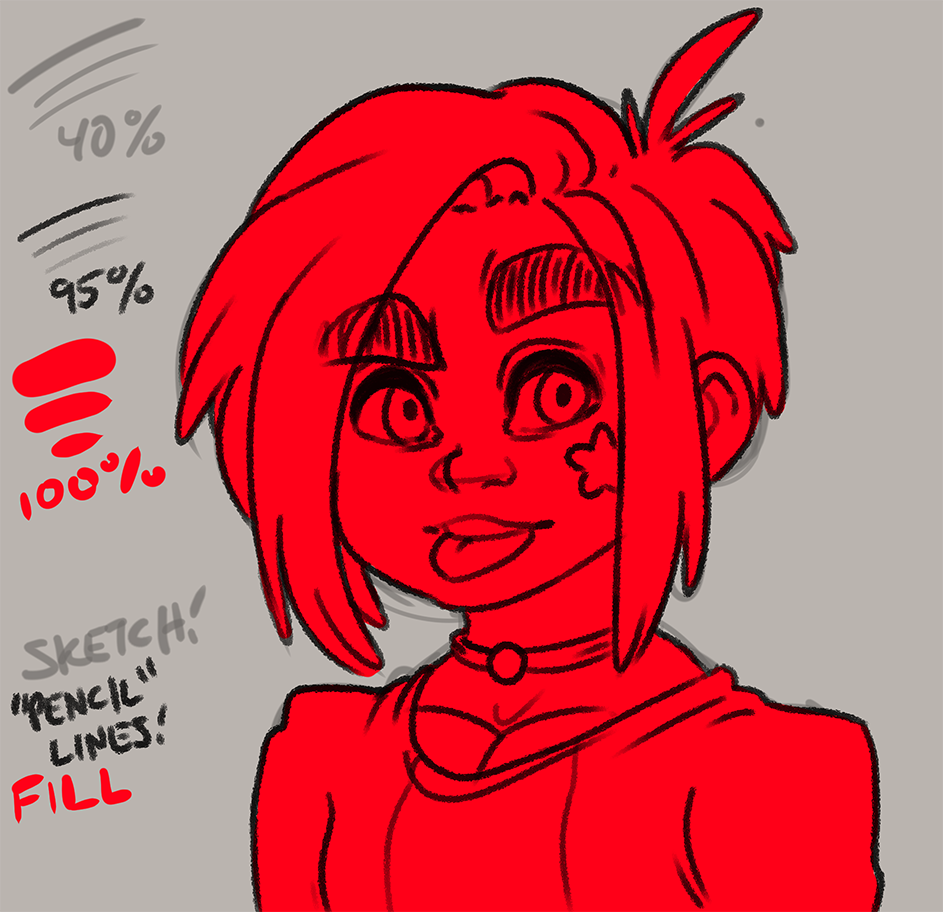
Now with just a huge old marker type brush with 100 hardness I make a layer where all of the colors are going to go. All of her colors will be clipping layers into this main layer so it's easier to color her in without going outside the lines.
If I'm not feeling lazy I make a new layer for every color, or set of colors. This makes it easy to change colors layer if I need to. By locking a layer's transparent pixels I can easily refill the layer with a new color. Since this is digital art I like to keep the whole image as mutable as I can for as long as possible which can be pretty easy these days. Every color clips into the main red layer.
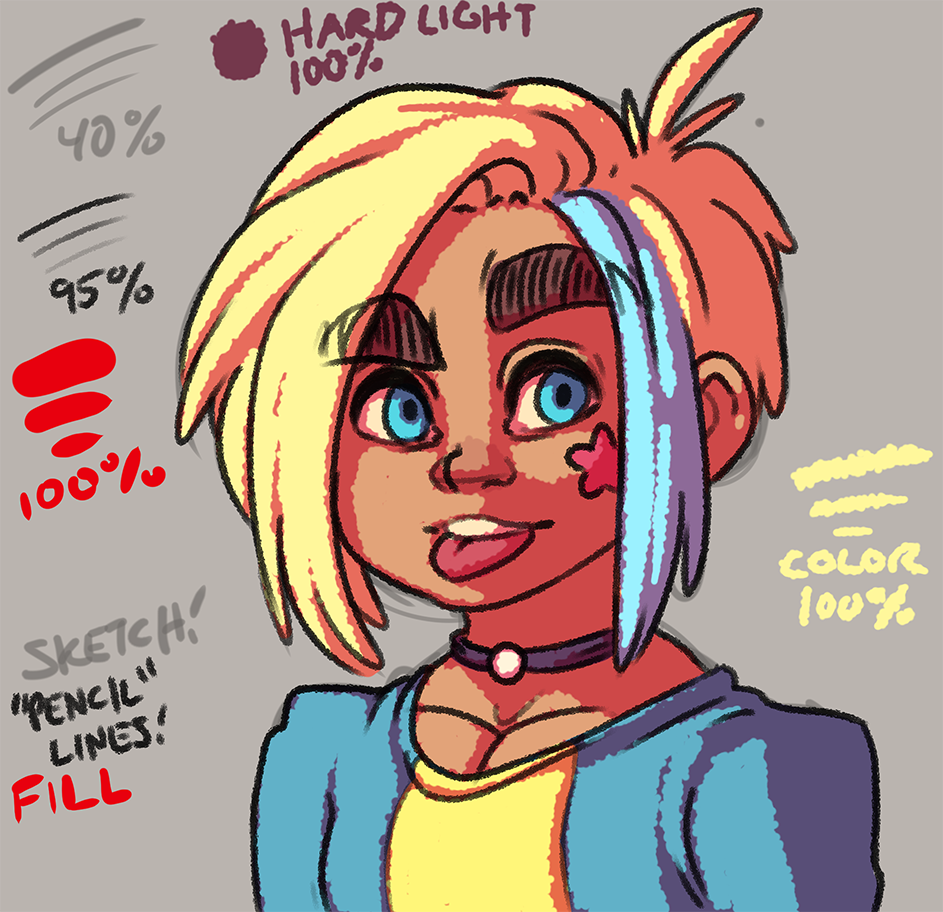
Now another clipping layer on top of all the colors goes down for the shading. I fill the entire layer with a dark brown or purple color usually, and set the blendmode to hard light. Using a layer mask then I paint black onto the mask which reveals the lit areas. I prefer to fill the canvas with shadow, and then remove it to add light. Shading feels much more natural that way. When I'm painting the light, and also painting transition between colors that arent separated by line work, I switch to another particle brush. This brush has a width of 100, particle size 20, particle density 4, spray deviation of 100, and hardness of 100.
To add a little bit more depth to the lighting I add another layer of shadow. This time a light blue color on a layer set to multiply. I paint in some areas that would be extra dark based on the light source and my totally not trained understanding of light.

Now to add some depth in the other direction: more light! A new layer set to screen lets me add some brighter areas very easily. I simply sample the color that I want to brighten, and then paint it into the screen layer. This results in a pretty good choice for a lighter color. I'm pretty liberal on this layer when it comes to hair since I like to make hair super shiny, but I try to not go crazy with the rest.
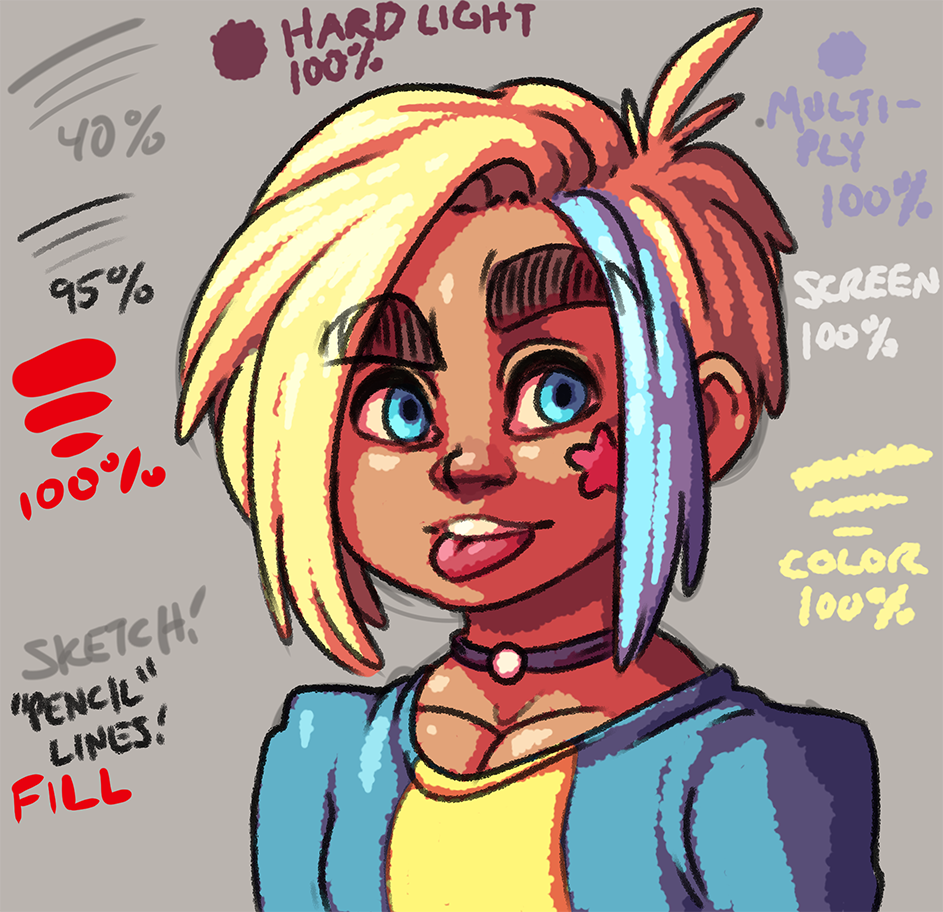
You know what really looks cool? Rim lighting for no reason! Using another new layer (also still clipping into the red layer fill layer) set to screen I paint light onto the edge of the character usually opposite of the main light source. I feel like this just makes whatever I'm drawing pop off the background even more. Probably not the best for every occasion, but this is all about looking cool as quickly and lazily as possible. Also I added a new layer just set to normal to add some pure white shine to her eyes and hair. Note that this is above the line art layer so that it actually obscures the lines on her eyes!
Usually after this I'll make it a little bit more fancy using Photoshop for post processing. Clip Studio is also capable, but Photoshop is a little bit better at adjusting colors at the end. For the sake of this example I'll call this done at this point.
Also here's the clip file if you want to check it out!
Okay so first I'm using Clip Studio which is an amazing piece of software that sometimes you can totally grab for just $20 when it's on sale. I'm drawing on a Wacom Cintiq 22HD.
I always like to show what the final result is first:
Okay! I start with a 30 pixel brush at 100 opacity with a hardness of 60, and a brush density of 80. I make a rough sketch on a layer of 40% opacity. I also usually make the canvas some sort of dull color instead of pure white since I find it way easier to draw, and color on a darker canvas. Also I usually work at double the resolution I plan to export the image as, so all of these images as examples are actually scaled down 50%!
On top of the sketch layer I drop a new layer for the line work. I use a brush that has particles to make it seem like a pencil on paper. With a brush size of 20, hardness 60, particle size 9, particle density 6, and spray deviation of 50 I draw over the sketch on a layer set to 95% opacity.
Now with just a huge old marker type brush with 100 hardness I make a layer where all of the colors are going to go. All of her colors will be clipping layers into this main layer so it's easier to color her in without going outside the lines.
If I'm not feeling lazy I make a new layer for every color, or set of colors. This makes it easy to change colors layer if I need to. By locking a layer's transparent pixels I can easily refill the layer with a new color. Since this is digital art I like to keep the whole image as mutable as I can for as long as possible which can be pretty easy these days. Every color clips into the main red layer.
Now another clipping layer on top of all the colors goes down for the shading. I fill the entire layer with a dark brown or purple color usually, and set the blendmode to hard light. Using a layer mask then I paint black onto the mask which reveals the lit areas. I prefer to fill the canvas with shadow, and then remove it to add light. Shading feels much more natural that way. When I'm painting the light, and also painting transition between colors that arent separated by line work, I switch to another particle brush. This brush has a width of 100, particle size 20, particle density 4, spray deviation of 100, and hardness of 100.
To add a little bit more depth to the lighting I add another layer of shadow. This time a light blue color on a layer set to multiply. I paint in some areas that would be extra dark based on the light source and my totally not trained understanding of light.
Now to add some depth in the other direction: more light! A new layer set to screen lets me add some brighter areas very easily. I simply sample the color that I want to brighten, and then paint it into the screen layer. This results in a pretty good choice for a lighter color. I'm pretty liberal on this layer when it comes to hair since I like to make hair super shiny, but I try to not go crazy with the rest.
You know what really looks cool? Rim lighting for no reason! Using another new layer (also still clipping into the red layer fill layer) set to screen I paint light onto the edge of the character usually opposite of the main light source. I feel like this just makes whatever I'm drawing pop off the background even more. Probably not the best for every occasion, but this is all about looking cool as quickly and lazily as possible. Also I added a new layer just set to normal to add some pure white shine to her eyes and hair. Note that this is above the line art layer so that it actually obscures the lines on her eyes!
Usually after this I'll make it a little bit more fancy using Photoshop for post processing. Clip Studio is also capable, but Photoshop is a little bit better at adjusting colors at the end. For the sake of this example I'll call this done at this point.
Also here's the clip file if you want to check it out!


Post your comment!